

How to guide
Updated: Tuesday, May 9th 2023
MachineApps - Palletizer
Introduction
Palletizer MachineApp is an easy-to-use and intuitive application to configure, program and operate your Vention palletizer. The palletizer MachineApp comes pre-loaded on the MachineMotion controller and can be accessed from Vention’s pendant, or through a computer located on the same network. Palletizer MachineApp includes features such as machine and pallet configuration setups, palletizing and layer patterns, error and notification management, real-time process performance, and a visual display the palletizing operations.
MachineApp - Palletizer’s functionalities include:
- Ability to configure unlimited pallet configurations
- Ability to configure teach points for each pick location
- Ability to customize box sizes
- Ability to palletize multiple pallets within one configuration file
- Jogger mode available to test machine configuration
- Ability to rotate boxes in various orientations (0 deg and 90 deg)
- Configure your pallet configuration in minutes
- Ability to configure separators
Step 1: Accessing MachineApps
Your palletizer MachineApps software will be preconfigured on your MachineMotion controller. To access the software, follow the steps below:
- Once you have assembled your palletizer, plug your controls, motors, and EOAT into the MachineMotion controller. Refer to MachineMotion user manual to learn more on how to configure your components to the controller.
- Connect your MachineMotion controller (using the fixed IP 192.168.7.2 Ethernet port) to a computer using an ethernet cable.
- POWER ON the MachineMotion controller by switching on the rocker switch. Wait for the status LED to turn green (~90 seconds).
- Open up your internet browser and enter “192.168.7.2/palletizer” in the address bar.
- You will be directed to the following screen:
Step 2: Setting up machine configuration files
This step will allow you to configure your actuators, inputs and outputs of the Vention palletizer.
Machine configuration is where you configure your palletizer’s actuators, sensors, IOs, speed, acceleration, network, gain, etc.
Step A - Setting up MachineMotion controllers
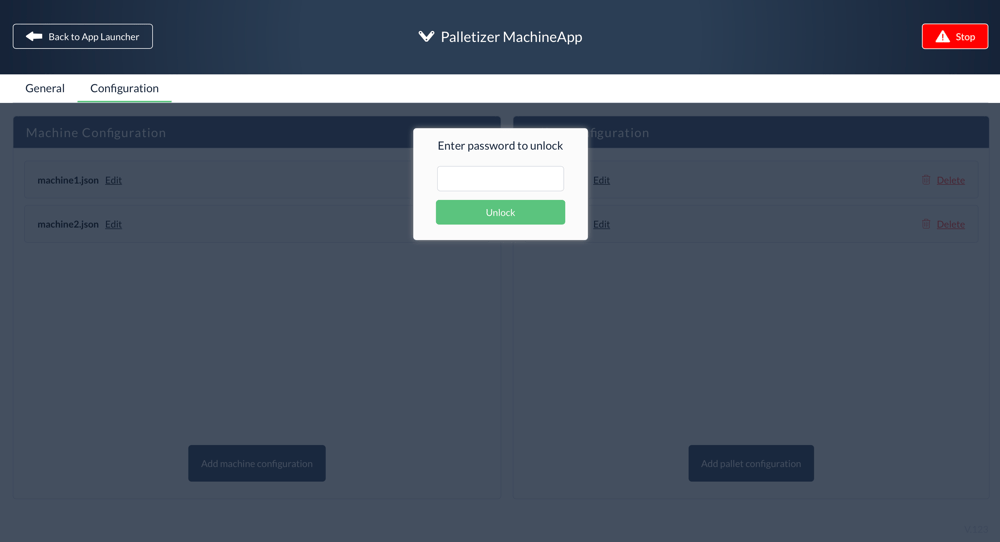
- Click on the “Configuration” tab and enter the password to unlock the screen. This is to allow only trained personnel to modify the configuration files (both machine and pallet configuration files). The password will be shipped with each order.
- Click on “Add machine configuration”.
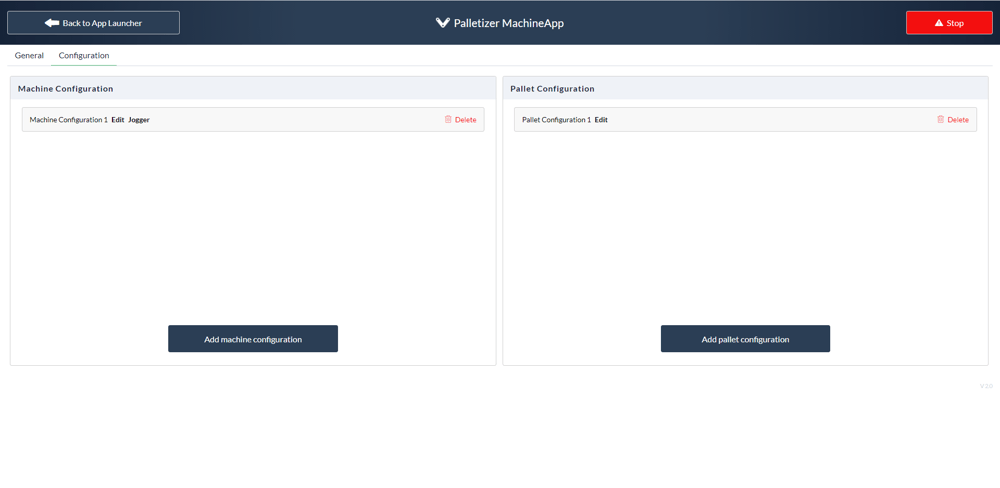
- Give the machine configuration a friendly name and click “Start configuration”

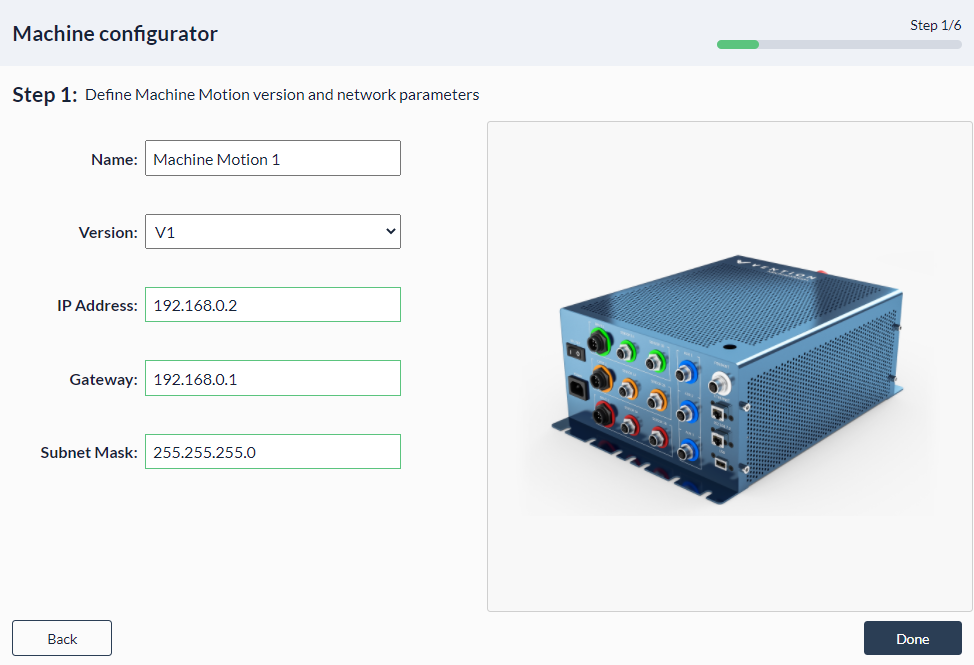
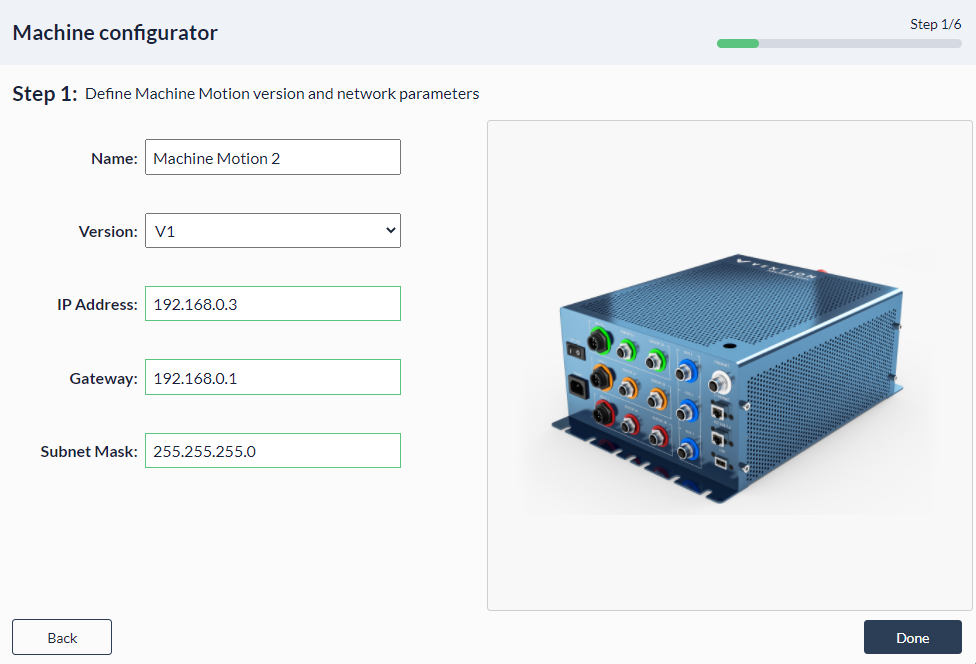
- Set up your MachineMotion controllers and enter the following information for the master controller:
- Name: Enter a name for the controller you can later refer to, to configure drives to the connected controller (i.e Parent controller, “192.168.7.2”).
- Version: v1
- IP address: 192.168.7.2
- Gateway: 192.168.0.1
-
Subnet Mask: 255.255.255.0
- If you have a second controller, click on “+ Add MachineMotion” and repeat step 3 to configure your slave controller with the following information:
- Name: Enter a name for the controller you can later refer to, to configure drives to the connected controller (i.e Parent controller, “192.168.7.2”).
- Version: v1
- IP address: 192.168.7.3
- Gateway: 192.168.0.1
-
Subnet Mask: 255.255.255.0
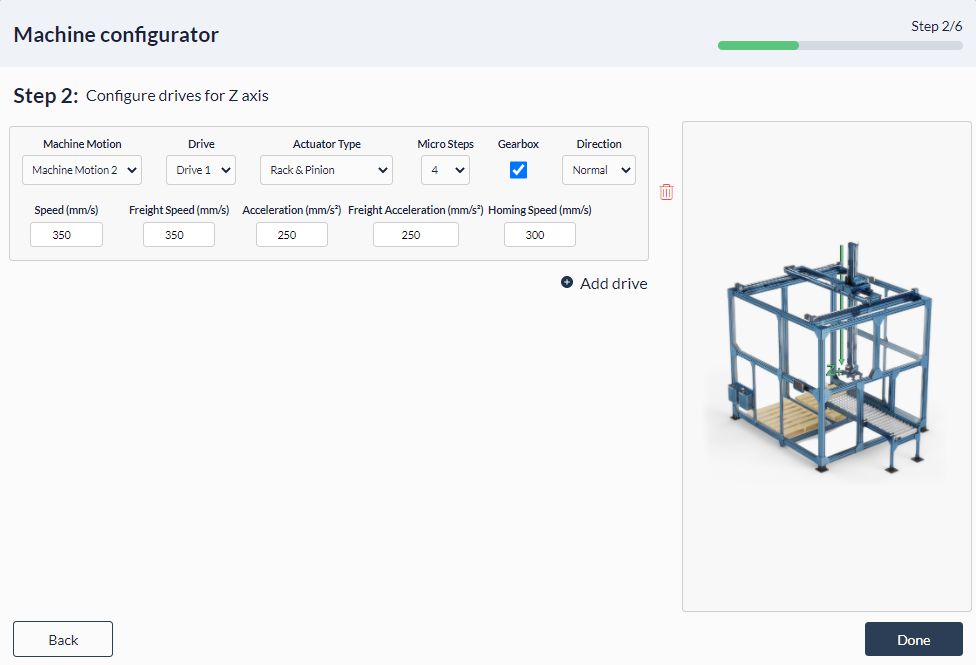
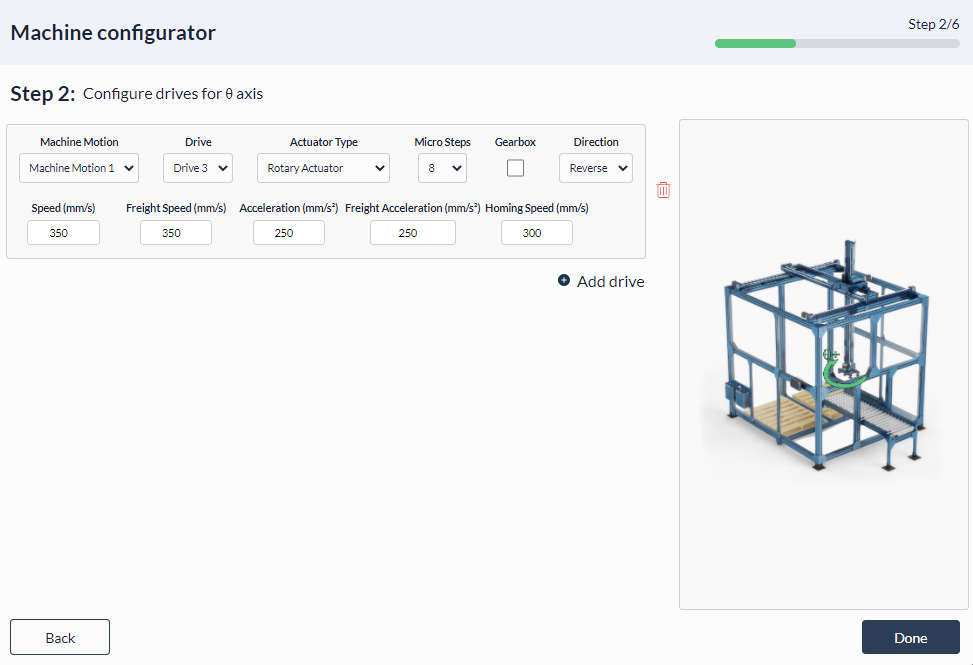
Step B - Setting up x, y, z and rotary actuators
Your path following MachineApps software will be preconfigured on your MachineMotion controller. To access the software, follow the steps below:
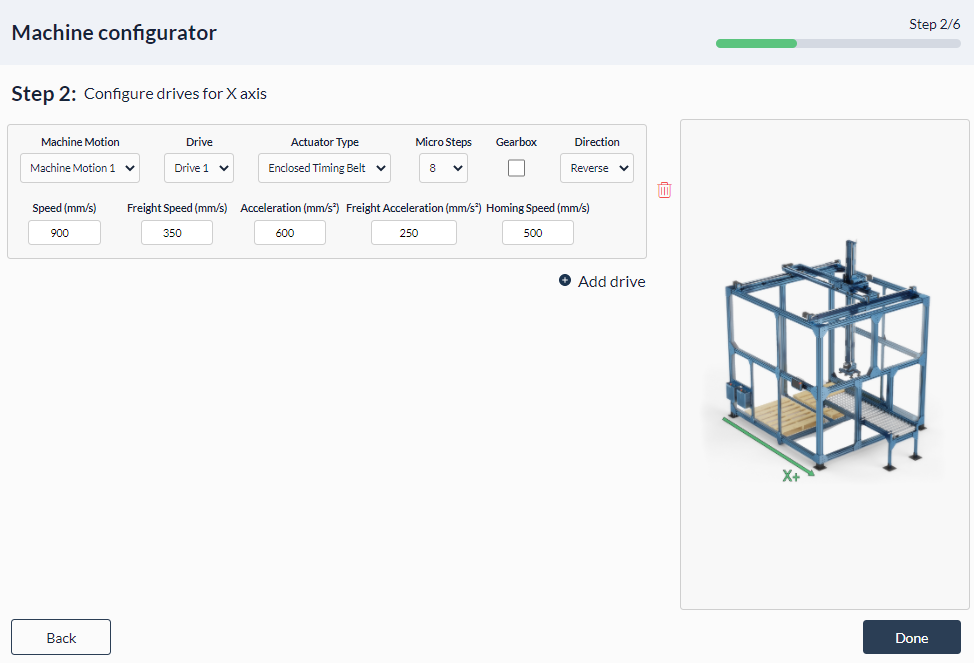
- Configure your “X” axis by selecting the actuator specified in your “Automated Systems Diagram”, provided with your order.
- MachineMotion: Select the MachineMotion controller associated with the “x-axis” actuator
- Drive: Select from the drop-down menu, the drive that is connected to your “x-axis” actuator. This should also be specified in the custom Automated System Diagram, that is shipped with your Vention equipment.
- Type: From the drop-down menu, select the actuator type
- Micro Steps: This is an advanced feature if more precision or more torque is required. Refer to your Automated System Diagram to enter the recommended micro steps.
- Gearbox: If you have a gearbox installed on the actuator, check-off “Gearbox”.
-
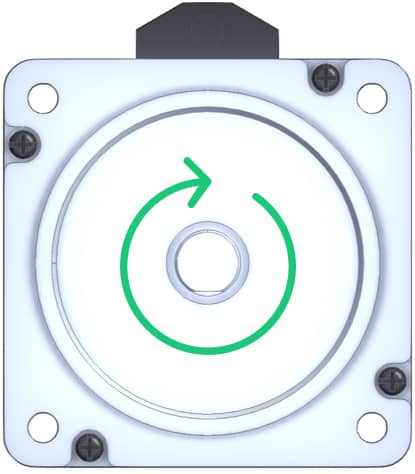
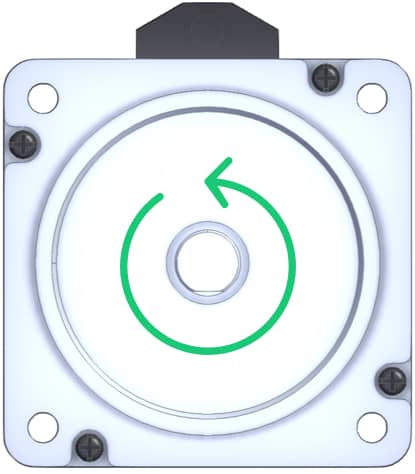
Direction: Rotation direction, see reference figure for motor rotation direction below:
- Speed (mm/s): Set maximum speed for the actuator to run without a payload. Refer to the actuator tech doc to configure the optimal speed.
- Freight Speed (mm/s): Set maximum speed for the actuator to run with full payload. Refer to the actuator tech doc to configure the optimal speed with respect to the payload.
- Acceleration (mm/s^2): Set maximum acceleration for the actuator to run without payload. Refer to the actuator tech doc to configure the optimal acceleration.
- Freight Acceleration (mm/s^2): Set maximum acceleration for the actuator to run with full payload. Refer to the actuator tech doc to configure the optimal acceleration.
-
Homing speed (mm/s): Set a homing speed you
-
Optional: If two motors are splitting the current from one drive using an out-of-phase power harness (CE-CA-026-0002), click “Add drive”. Configure the same MachineMotion, drive, actuator type, micro steps, gearbox, speed and acceleration. Under the “Direction” drop down menu, select the opposite motor direction that you have configured for the same axis.
Important note: Only one drive set-up is required if two drives are internally synchronized. This means that two motors are using two drives, however, they are synchronized prior to shipment of the order. Please refer to your Automated System Diagram to confirm how motors are synchronized if multiple motors are used to drive an axis. - Repeat the same steps for “y, z and θ” axes.Ensure you always refer to your “Automated Systems Diagram”.

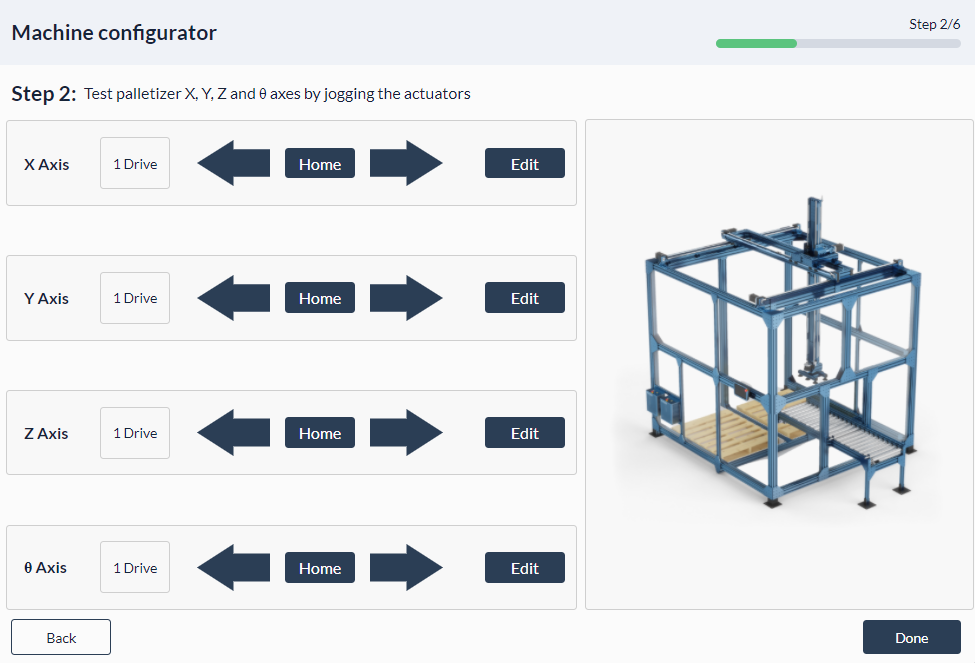
- Jog each actuator using the left or right arrows. Each click jogs the actuator 50 mm. Once you have verified that each actuator moves as expected, you may home each actuator.
Important note: It is recommended to always home the z-axis first and to ensure its “Home” position is sending the z-axis to its fully raised position. If you need to edit any actuator properties, click on “Edit”.
Step C - Setting up digital outputs
- Configure the digital output for your EOAT. Enter:
- MachineMotion: From the drop-down menu, select the controller that is connected to the digital IO module that the EOAT is connected to.
- IO Module: From the drop-down menu, select the IO module that is connected to the EOAT.
The pin-out diagram could be found from any EOAT pin-out diagram. Configure accordingly.
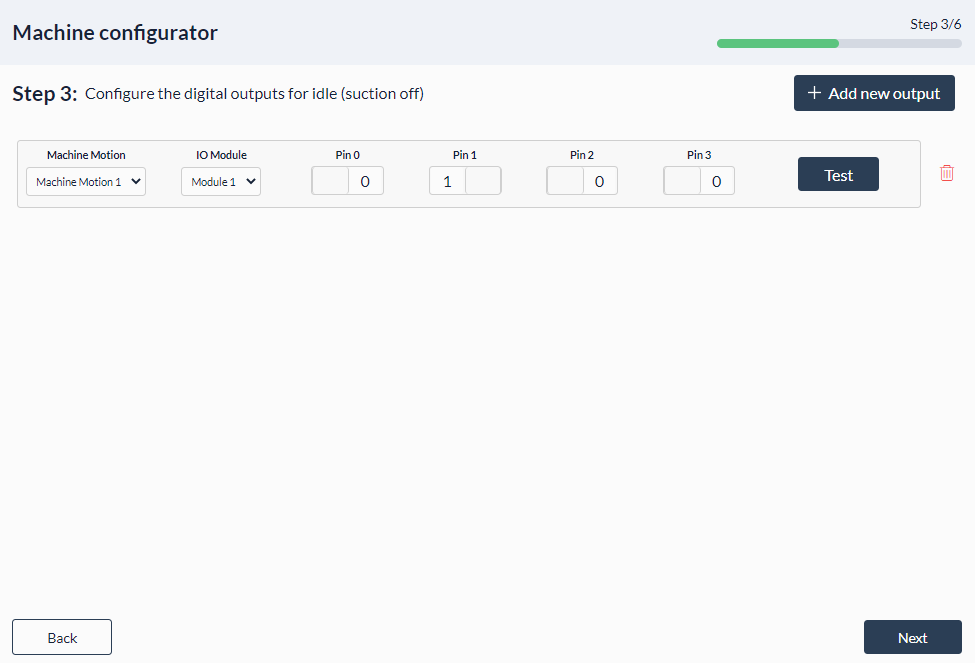
- Once the suction off configuration is completed, click “Test”. If properly configured, the digital IO module should light up for that output.
- Configure the digital output for your EOAT. This set-up will be for an active setting (suction on). Enter:
- MachineMotion: From the drop-down menu, select the controller that is connected to the digital IO module that the EOAT is connected to.
- IO Module: From the drop-down menu, select the IO module that is connected to the EOAT.
The pin-out diagram could be found from any EOAT pin-out diagram. Configure accordingly.
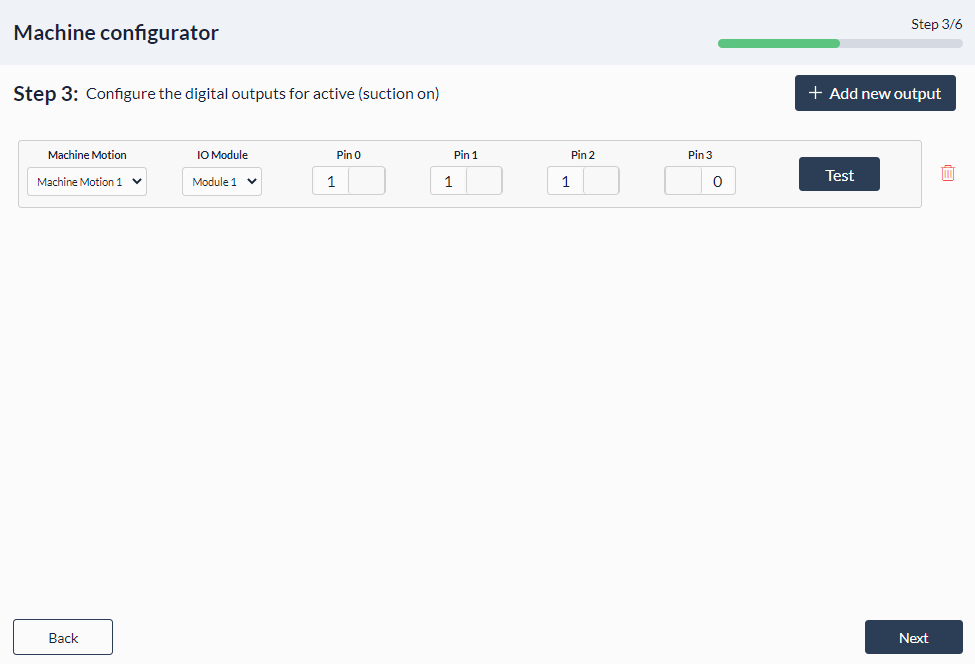
- Once the suction on configuration is completed, click “Test”. If properly configured, the digital IO module should light up for that output.
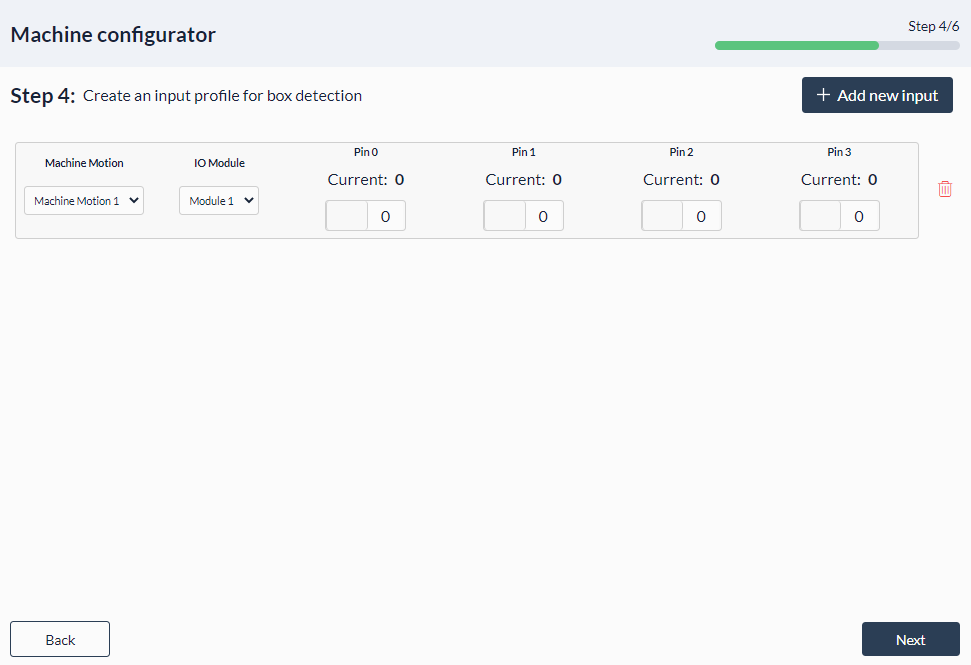
Step D - Setting up digital inputs
- Optional: Click on “Add new input” if you would like to set up an input device for the detection of a box before sending a command for the palletizer to go to its pick location. Example could include a through beam sensor (CE-SN-006-0001), or retro-reflective sensor (CE-SN-003-0001).
Step E - Setting up digital input for picked box detection
- Set the input signal that indicates the box has been properly picked. There is an indicator of the current state and the configurable pins 0, 1, 2, 3 for your input detection. Refer to your EOAT pin out diagram to configure this step. If this input signal detects changes during the palletizing path, an error will appear in your status log to alert operator presence.

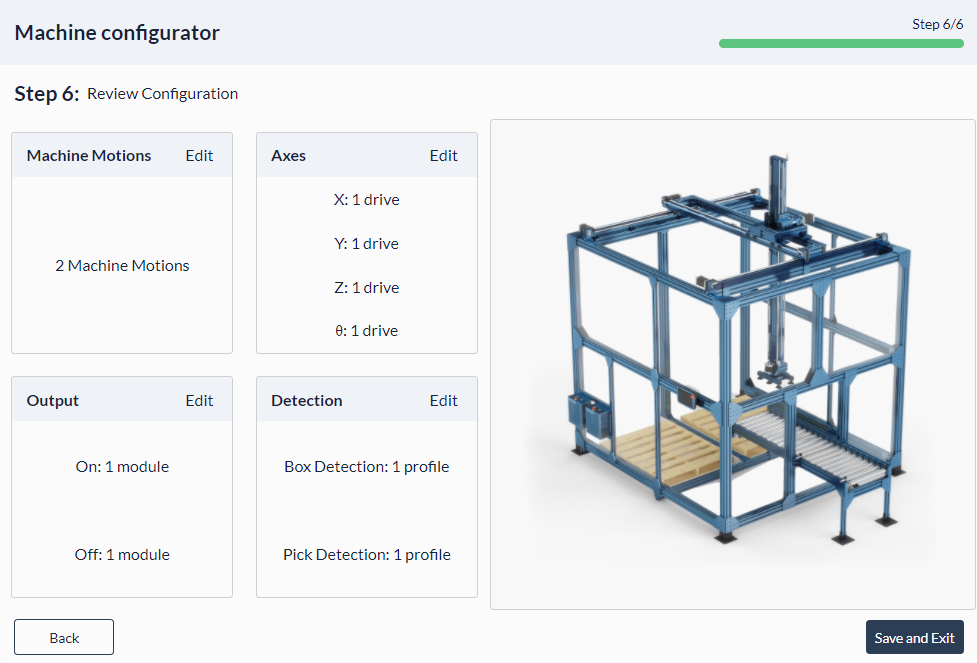
Step F - Review machine configuration
- Last step is to review your machine configuration. Once all information is verified, click “Save and exit”.
Accessing the jogger
Access the manual jogger for your machine configuration any time after you have completed configuring your machine. You may home each actuator, select the increment and speed you would like to jog each actuator. Each arrow has its respective axis labelled that corresponds to your actuator.
Step 3: Setting up pallet configuration files
Pallet configuration is where you configure your pallet location, pallet layout, pick locations, and box sizes.
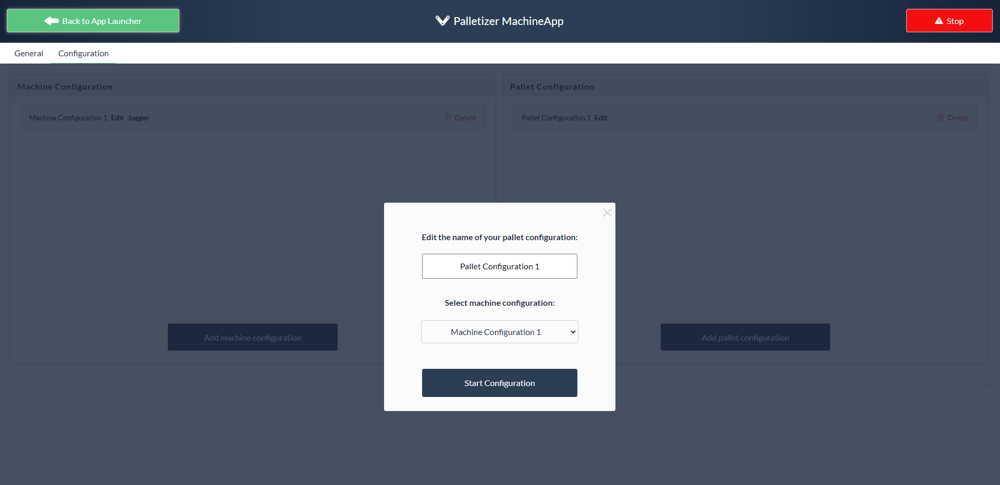
Step A - Associate a machine configuration to the palletizer configuration*
- Click on the “Configuration” tab, the screen will be locked. This lock is to allow only trained personnel to edit the configuration files (both machine and pallet configuration files). The password will be shipped with each order.
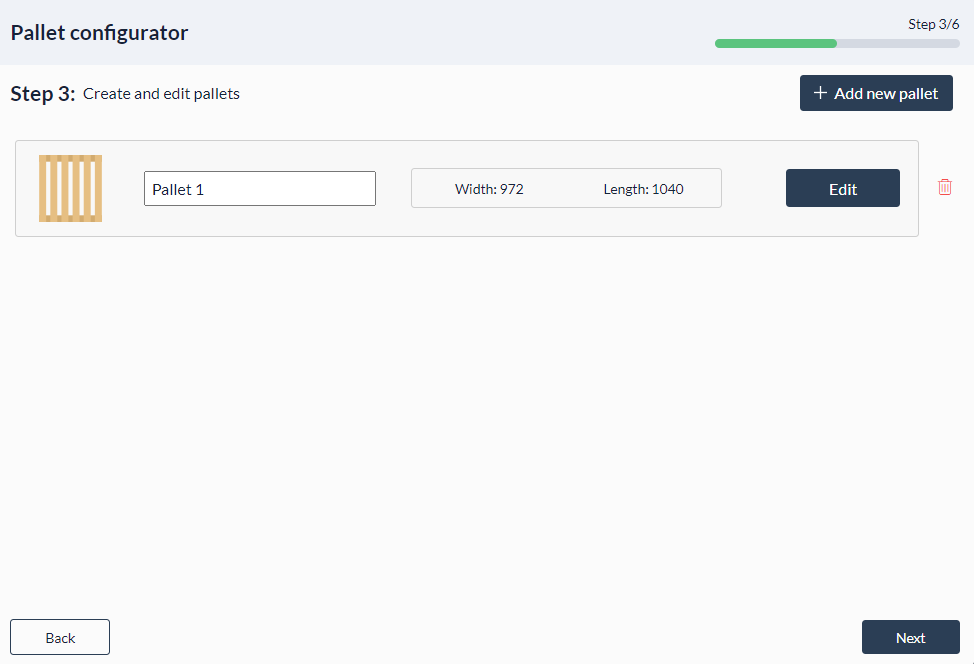
- Click “Add pallet configuration” and enter a friendly name for your pallet configuration and select the machine configuration from the drop down menu to use in order to set up your pallet configuration. You may have an unlimited number of pallet configurations that you could call to execute in the general tab.
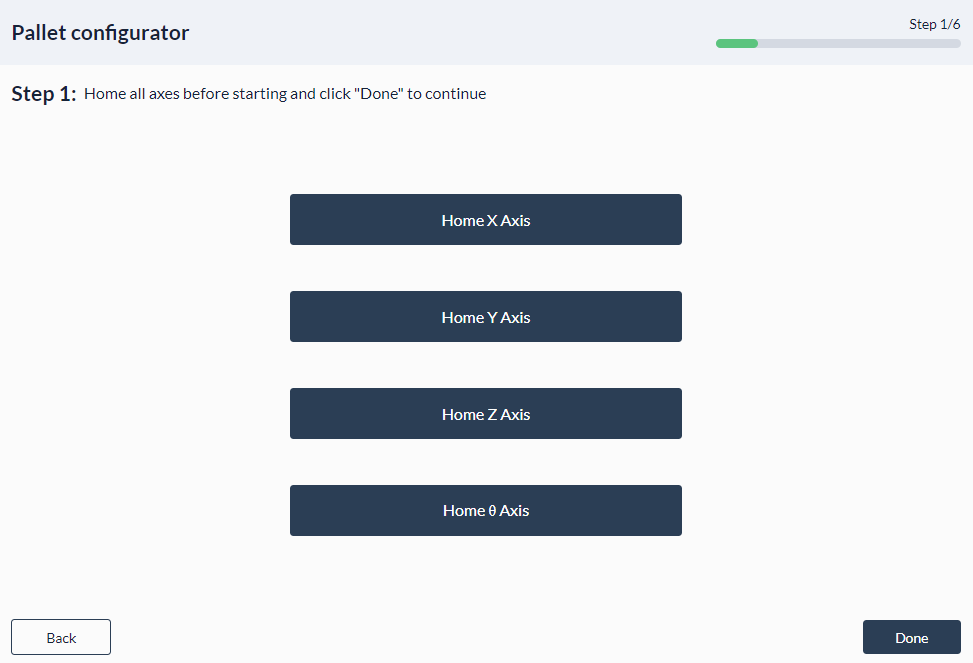
- Home all actuators to zero the position of each actuator. Please ensure you complete this step, otherwise, your teach points in the future steps could be incorrect. Click “Done” once all actuators are homed.
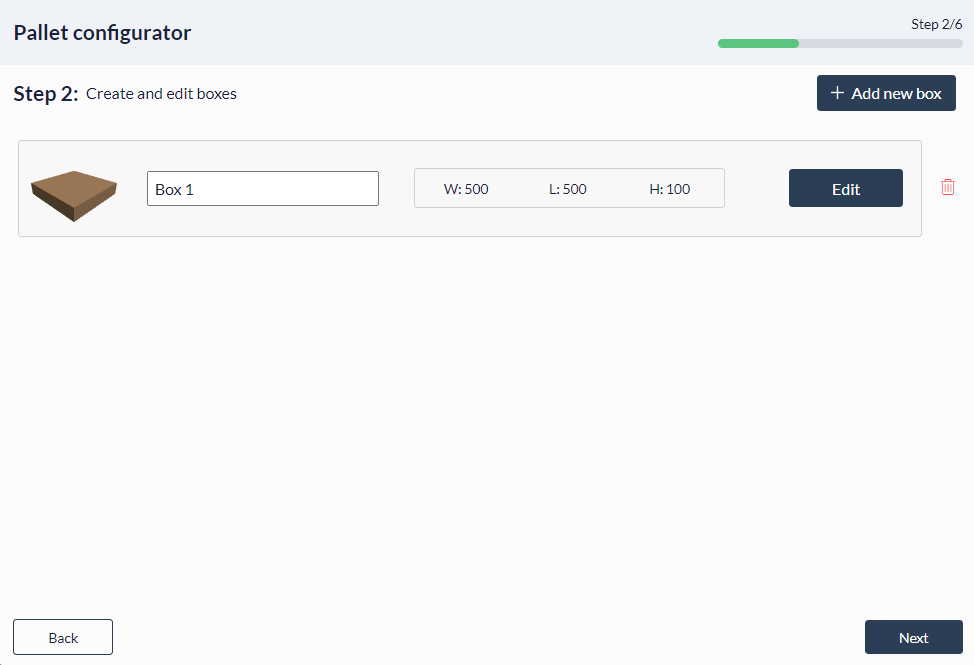
Step B - Configure box sizes and pick locations
- Enter the width, length and height of your first box in millimeters.
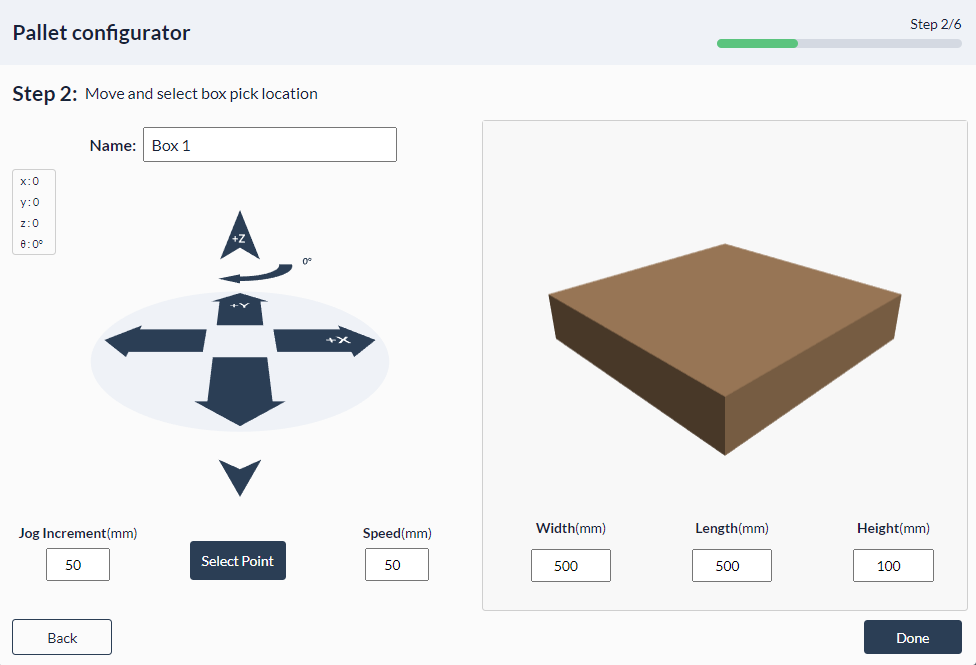
- Position the box at the pick point location (typically, your infeed conveyor). Ensure the pick point of the box is in a repeatable location. The objective is to jog the center point of the EOAT to reach the center point of the box (we recommend marking the center location of one box as a reference point).
- Set the jog increment and speed to jog each actuator using the associated jogging arrows.
Tip: Be careful when jogging the z-axis and use smaller increments than your x and y axis. At any point, you feel that you may have jogged at too high of an increment, be prepared to use the e-stop.
- Click “Select Point” when you would like to teach the position.
- Click “Done” once you have completed teaching the pick-box location.
- Click “+ Add new box” and repeat steps 1 to 5 to configure another box.
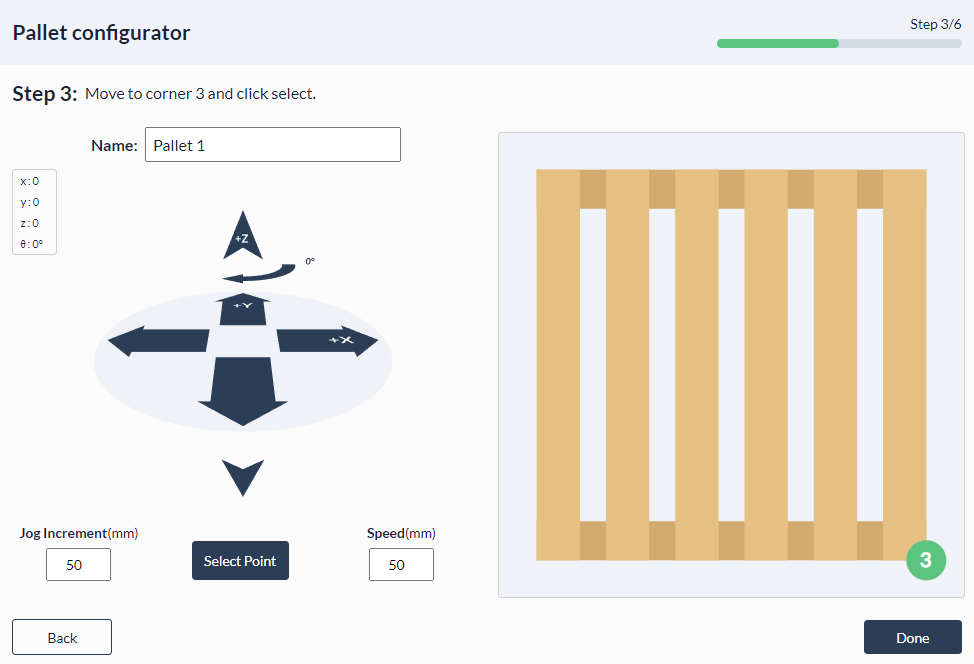
Step C - Teach pallet location
- Ensure the pallet is in a repeatable location. Place a configured box onto three corners of your pallet. The orientation of the width of your box should be parallel to the x-axis of the pallet (in reference to your machine).
- Set the jog increment and speed to jog each actuator using the associated jogging arrows.
Tip: Be careful when jogging the z-axis and use smaller increments than your x and y axis. At any point, you feel that you may have jogged at too high of an increment, be prepared to use the e-stop. - Jog the EOAT to the center of the box at a corner of the pallet. Once the EOAT has reached the center of the box, click “Select Point”.

- The next position of the corner will appear. Jog the EOAT to the second box center at a corner of the pallet. Once the EOAT has reached the center of the box, click “Select Point”.
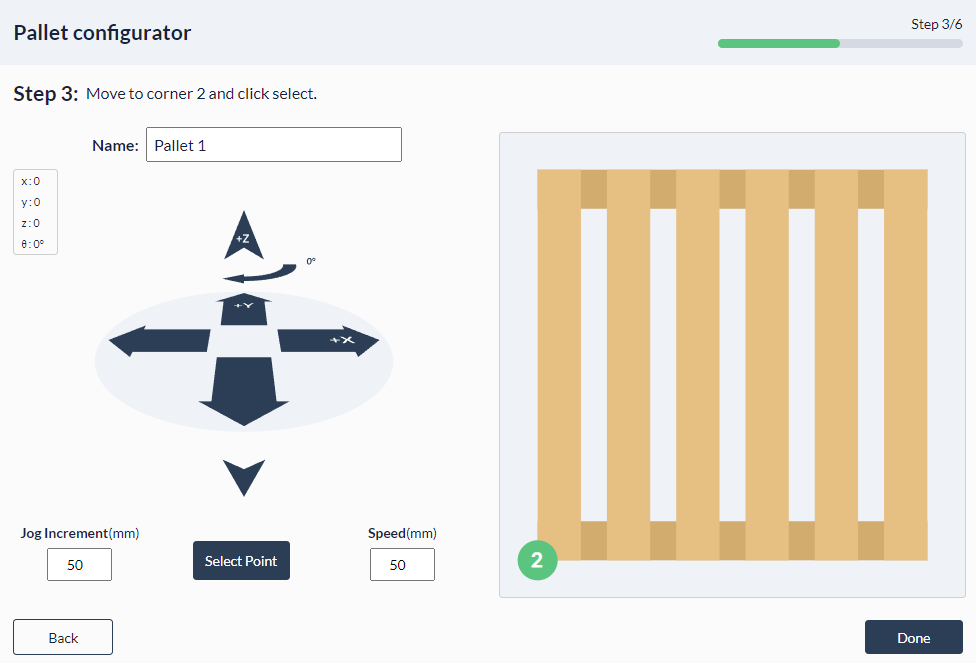
- The final position of the corner will appear. Jog the EOAT to the third/final center box at a corner of the pallet. Once the EOAT has reached the center of the box, click “Select Point”.
-
Optional: If you have multiple pallets, click “+ Add new pallet” and repeat the steps above.
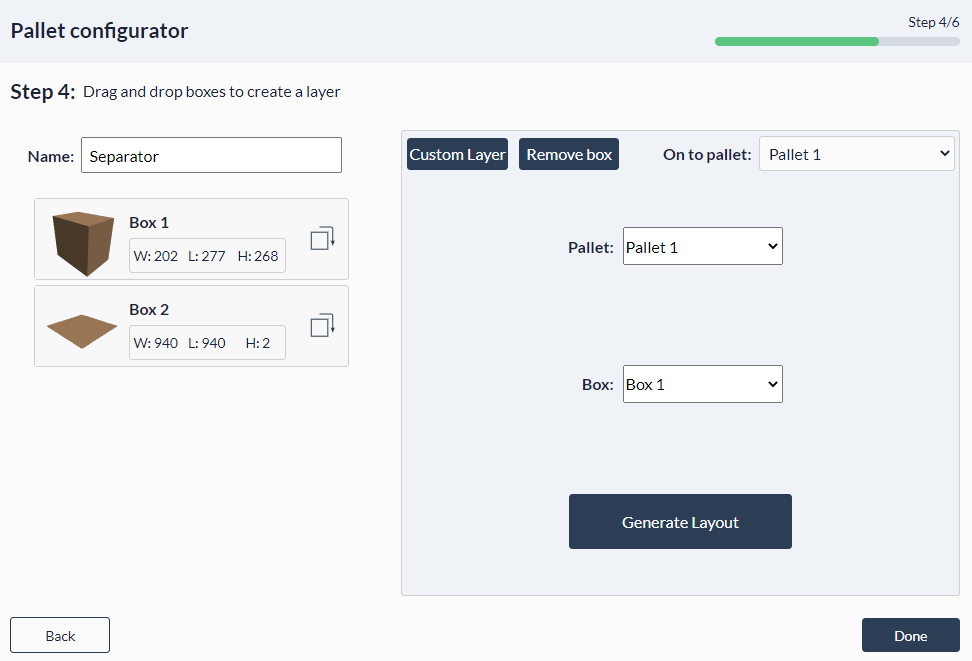
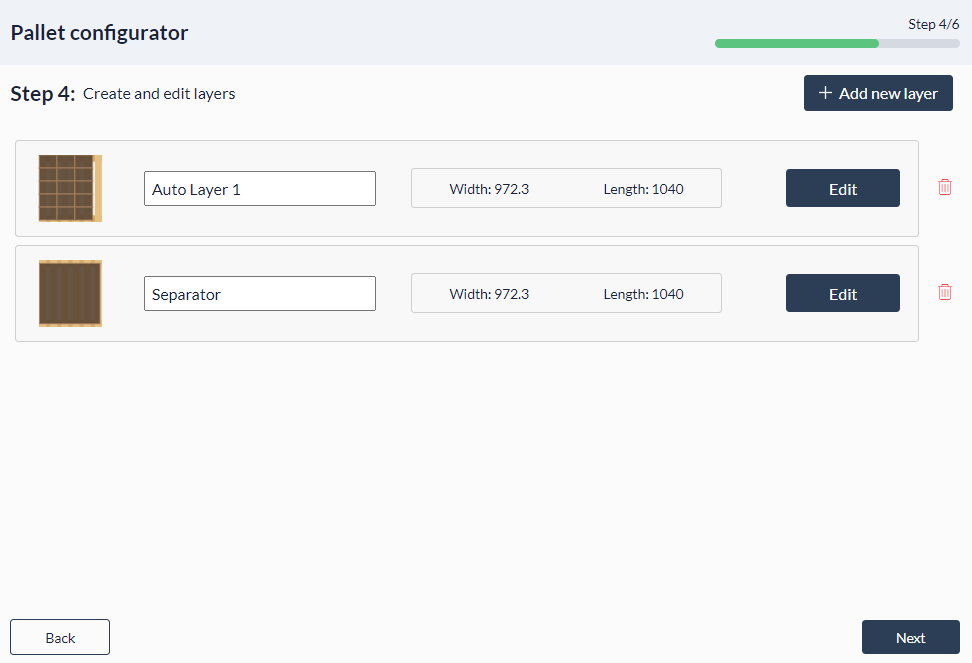
Step D - Configure pallet layers
A pallet layer defines how the boxes will be oriented and organized on each layer of the pallet. Only create a new pallet layer if the pallet layer is unique. The next step will allow you to define how the pallet layers will be stacked on the pallet to create your pallet layout.
- From the drop down menu (“On to pallet”), select the pallet you would like to configure the pallet layer for.

Tip: If this is a new pallet configuration, we recommend creating a layer that has a box located on each corner of the pallet and run only that layer to ensure the drop positions are correct.
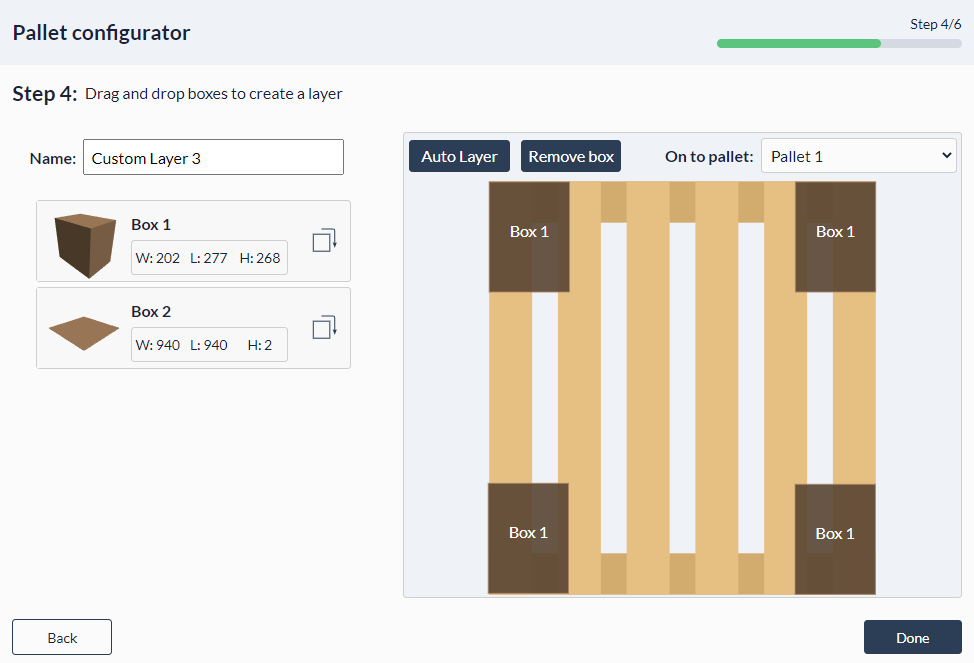
- Drag and drop boxes onto the pallet layer to organize the layer or click “Auto Layer” to propose the most optimized layer layout. The first box should be dropped from the furthest left point from the pick location.
- Click the “Rotate box” icon to rotate the box orientation by 90 deg. Then drag and drop the newly oriented box onto the pallet.
- Left-click and hold the box to reposition the box on the pallet.
- Click the “Remove” button to remove the last box that was dropped onto the pallet.
- Once the pallet layer is fully configured, click “Done”.
- Click “+ Add new layer” to add another layer pattern for your pallet. Repeat previous steps to configure a new layer.
Step E: Configure pallet layout
Define how the layers would be stacked to configure your pallet layout. The first layer is referenced from the bottom of the pallet.
- Select the layer pattern from the drop down menu to configure the bottom layer.
- Click “+ Add layer” to define the second layer pattern.
- Click the trash can to delete a layer if needed.
- Repeat until the full pallet layout is configured. Click “Next” once completed.
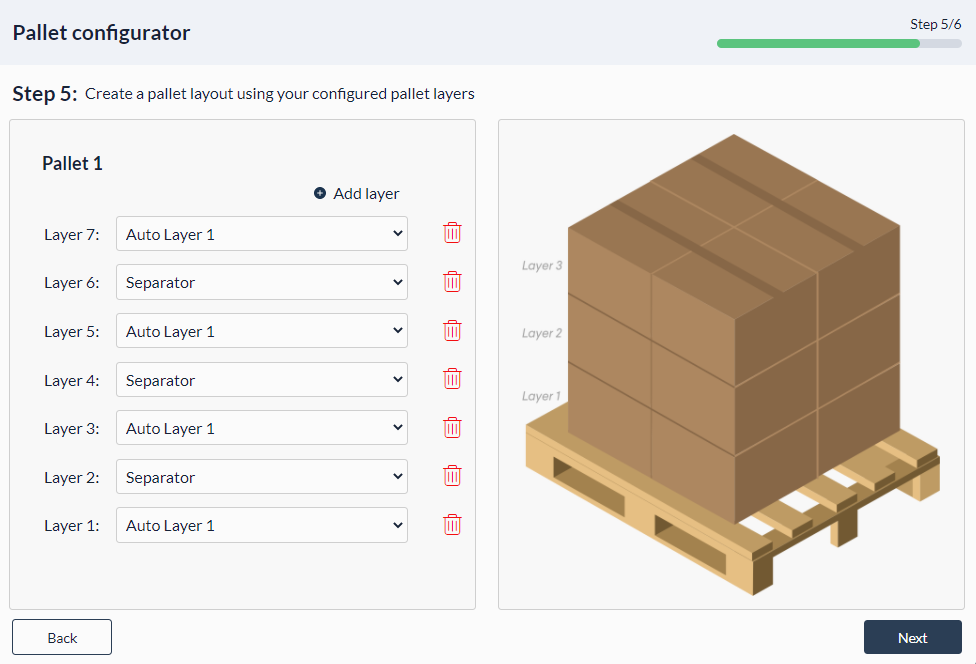
Step F: Review the pallet following configuration
The model located on the right should be a representation of the full pallet the configuration will execute.
- Once you have reviewed the pallet layout and you are satisfied with the configuration, click “Save and Exit”.

Step 4: Run your program
This step allows you to run the configuration files you have set up, inspect your system status and console information.
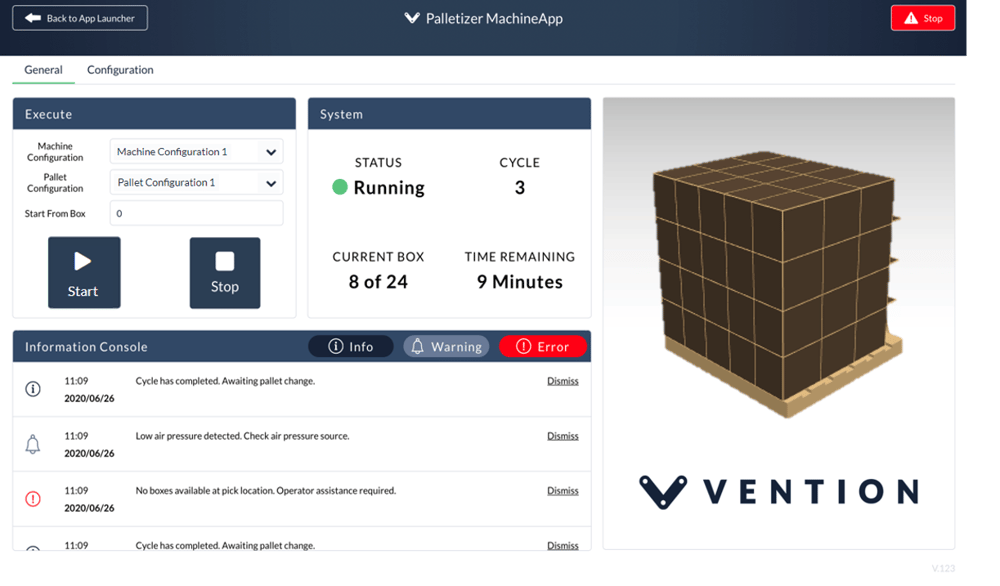
- To operate your palletizer, go to the “General” tab.
Pallet display and execution menu
- Select from the drop-down “Pallet Configuration” menu to select your palletizer configuration file. The associated machine configuration will be set for that pallet configuration without needing to access the “Machine Configuration” drop down
- Optional: There is a “Start from box” text box that allows you to enter integers to start from a specified box location. The widget to the right will visually update to the box position you have specified.
- Press “Start” whenever you are ready to start your pallet configuration file. The “Start” button will automatically toggle to a “Pause” button to allow you to temporarily pause the movement of the palletizer. Pressing “Start” again will resume it’s regular path without homing the actuators.
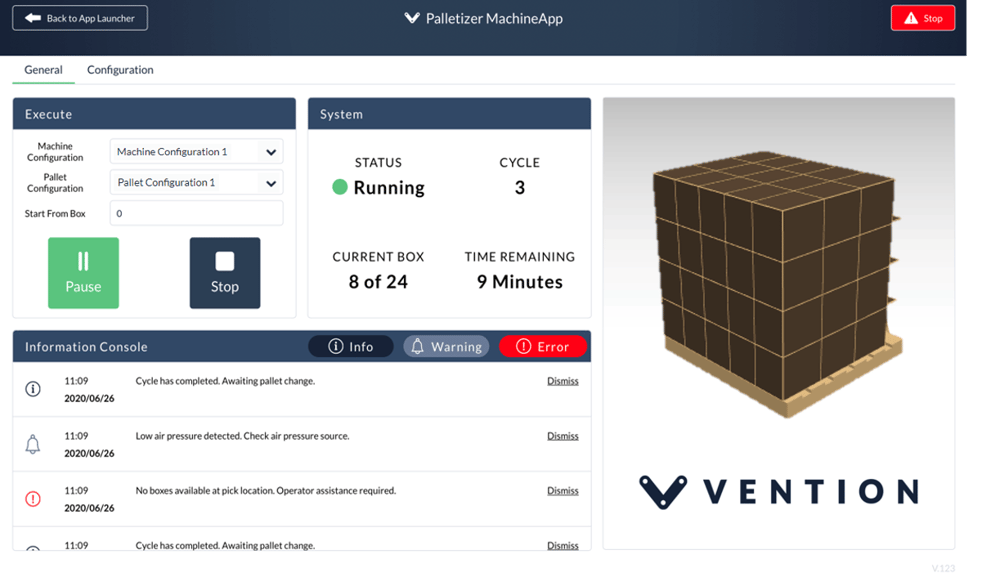
- Press “Stop” when you would like to stop all movement of the palletizer. Pressing “Start” again will re-home all actuators and restart the pallet configuration from the start.
- Once your palletizer has completed your pallet configuration, the palletizer will re-home and stay in that position until you press “Start” to execute a different pallet configuration or the same one.
System status
Check the status of your palletizer:
Status:
Running: The palletizer is running as expected
Warning: The palletizer detects an potential error that may require operator assistance
Inactive The palletizer has stopped due to the “Stop” button being triggered or the palletizer has stopped due to a detected error
Cycle: Indicates the operation cycle
Time remaining: Indicates the remaining time to complete the cycle
Current box: Indicates the box currently being palletized
Information console
The information console will assist with diagnosing the errors with the machine. Each error code would either be labelled:
Info: Updates on the operator of various statuses of the palletizer. No action required from operator.
Warning: May require attention from the operator where an error could potentially occur.
Error: The palletizer will stop running because the palletizer requires immediate assistance from an operator.
