Support
0
Cart
Sign In
vention-logo
  • Design
    MachineScope icon
    MachineScope Define project requirements
    MachineBuilder icon
    MachineBuilder Design your machine
    Automate
    MachineLogic icon
    MachineLogic Program code-free
    MachineApps icon
    MachineApps Out-of-the-box software
    Order & Deploy
    MachinePortal icon
    MachinePortal Track orders & collaborate
    MachineCloud icon
    MachineCloud Deploy & monitor remotely
    Watch a demo
    Learn about our platform
    • Applications by Factory Floor
      View Vention designs by factory floor area
    • Applications by Industry
      View Vention designs by industry
    • Why automate with Vention?
      Learn about the proven benefits of automating with Vention.
    Learn more about applications
    Manufacturing
    • Bin Picking
    • Gantry Systems & Path Following
    • Machine Tending
    • Robot 7th Axis
    • Robot Pedestals & Bases
    • Sanding & Surface Finishing
    • Safety Enclosures
    Assembly
    • Jigs & Fixtures
    • Pick & Place
    • Shelves & Racks
    • Timing Belt Conveyors
    • Workstations
    Material Handling
    • AGV Top Modules
    • Conveyors
    • Industrial Carts
    Packaging
    • Box Erecting
    • Cartesian Palletizer
    • Cobot Palletizer
    • Case Packing
    • Industrial Robot Palletizer
    Learn more about applications
    Food & Beverage
    • Box Erecting
    • Case Packing
    • Cobot Palletizer
    • Industrial Robot Palletizer
    Automotive
    • AGV Top Modules
    • Gantry Systems & Path Following
    • Industrial Carts
    • Jigs & Fixtures
    Aerospace & Defense
    • Industrial Carts
    • Jigs & Fixtures
    • Machine Tending
    • Robot 7th Axis
    Medical
    • Machine Tending
    • Pick & Place
    • Robot 7th Axis
    • Timing Belt Conveyors
    Electronics
    • Pick & Place
    • Robot Pedestals & Bases
    • Timing Belt Conveyors
    • Workstations
    Industrial
    • Conveyors
    • Machine Tending
    • Robot Pedestals & Bases
    • Workstations
    Job Shop
    • Machine Tending
    • Robot 7th Axis
    • Robot Pedestals & Bases
    • Sanding & Surface Finishing
    Robotics
    • Bin Picking
    • Robot 7th Axis
    • Robot Pedestals & Bases
    • Safety Enclosures
    Fast ROI

    With Vention productized applications and self-deployment options, eliminate non-recurring cost and accelerate return on investment

    Field Proven

    Vention applications are built with hardware and software technology that have been deployed tens of thousands times

    Dependable

    Gain access to best-in-class automation expertise in one-click with dedicated customer service team and on-demand remote support options

    Future Proof

    With over 100 engineers continuously developing the Vention platform, your application will be supported over the long run

    Why Automate

    Manufacturing automation, simplified

    Scalable automation applications, built on rock-solid foundations Application Overview
  • Designs Library
    All designs
    Explore Official Designs

    Customizable Template

    Find a customizable design for your specific need, designed by Vention experts.
    Explore Official Designs
    Discover Community Designs

    Design Inspiration

    Discover design inspiration, created by Vention community members.
    Discover Community Designs
  • Hardware Technology
    MachineMotion icon
    MachineMotion Plug & play machine control
    MachineFrame icon
    MachineFrame Modular extrusion profiles
    Actuators icon
    Actuators Linear & rotary motion
    Hardware Library
    Browse all parts
    • Structural & Framing
    • Frame Accessories
    • Fixtures & Tooling
    • Panels and Table Tops
    • Robot Mounting
    • Robot End-of-Arm Tools
    • Robots
    • Safety
    • Wheels
    • Linear Motion
    • Rotary Motion
    • Pneumatics
    • Material Handling
    • Controls & Motors
    • Software
    • Cabling
    • Fasteners
    • Consumables
    • Tools
    • Merchandise
  • Resources
    • Resource Center
    • Customer Stories
    • Video Tutorials
    • Webinars
    • Blog
    Tools
    • ROI Calculator
    • Friction Joint Calculator
    • Deflection Calculator
    • Palletizing App
    • Path Following App
    • Factory Acceptance Checklist
    • Site Acceptance Checklist
    Community
    • Community Overview
    • Top Designers
    • Forum
    • Gallery
    Services
    • Support Packages
    • Technical Support
    • FAQ
    Connect
    • About Us
    • Press
    • Contact Us
    • Careers
    • Events
    • Vention Experience Center
    Tutorials
    Navigating MachineBuilder
    Navigating MachineBuilder Take a tour of Vention's Cloud-CAD platform, MachineBuilder
    All tutorials
vention-logo
Sign In Get Support

Platform

  • MachineScope icon
    MachineScope Define project requirements
  • MachineBuilder icon
    MachineBuilder Design your machine
  • MachineLogic icon
    MachineLogic Program code-free
  • MachineApps icon
    MachineApps Out-of-the-box software
  • MachinePortal icon
    MachinePortal Track orders & collaborate
  • MachineCloud icon
    MachineCloud Deploy & monitor remotely
Sign In Get Support

Application

Applications by Factory Floor

  • Bin Picking
  • Gantry Systems & Path Following
  • Machine Tending
  • Robot 7th Axis
  • Robot Pedestals & Bases
  • Sanding & Surface Finishing
  • Safety Enclosures
  • Jigs & Fixtures
  • Pick & Place
  • Shelves & Racks
  • Timing Belt Conveyors
  • Workstations
  • AGV Top Modules
  • Conveyors
  • Industrial Carts
  • Box Erecting
  • Cartesian Palletizer
  • Cobot Palletizer
  • Case Packing
  • Industrial Robot Palletizer
Sign In Get Support

Applications by Industry

  • Box Erecting
  • Case Packing
  • Cobot Palletizer
  • Industrial Robot Palletizer
  • AGV Top Modules
  • Gantry Systems & Path Following
  • Industrial Carts
  • Jigs & Fixtures
  • Industrial Carts
  • Jigs & Fixtures
  • Machine Tending
  • Robot 7th Axis
  • Machine Tending
  • Pick & Place
  • Robot 7th Axis
  • Timing Belt Conveyors
  • Pick & Place
  • Robot Pedestals & Bases
  • Timing Belt Conveyors
  • Workstations
  • Conveyors
  • Machine Tending
  • Robot Pedestals & Bases
  • Workstations
  • Machine Tending
  • Robot 7th Axis
  • Robot Pedestals & Bases
  • Sanding & Surface Finishing
  • Bin Picking
  • Robot 7th Axis
  • Robot Pedestals & Bases
  • Safety Enclosures
Sign In Get Support
Sign In Get Support

Design

Customizable Template

Find a customizable design for your specific need, designed by Vention experts. Explore Official Designs

Design Inspiration

Discover design inspiration, created by Vention community members. Discover Community Designs
Sign In Get Support

Hardware

  • Browse all parts
  • Structural & Framing
  • Frame Accessories
  • Fixtures & Tooling
  • Panels and Table Tops
  • Robot Mounting
  • Robot End-of-Arm Tools
  • Robots
  • Safety
  • Wheels
  • Linear Motion
  • Rotary Motion
  • Pneumatics
  • Material Handling
  • Controls & Motors
  • Software
  • Cabling
  • Fasteners
  • Consumables
  • Tools
  • Merchandise
  • MachineMotion icon
    MachineMotion Plug & play machine control
  • MachineFrame icon
    MachineFrame Modular extrusion profiles
  • Actuators icon
    Actuators Linear & rotary motion
Sign In Get Support

Learn

  • Resource Center
  • Customer Stories
  • Video Tutorials
  • Webinars
  • Blog
  • ROI Calculator
  • Friction Joint Calculator
  • Deflection Calculator
  • Palletizing App
  • Path Following App
  • Factory Acceptance Checklist
  • Site Acceptance Checklist
  • Community Overview
  • Top Designers
  • Forum
  • Gallery
  • Support Packages
  • Technical Support
  • FAQ
  • About Us
  • Press
  • Contact Us
  • Careers
  • Events
  • Vention Experience Center
Tutorials
All tutorials
Navigating MachineBuilder
Navigating MachineBuilder Take a tour of Vention's Cloud-CAD platform, MachineBuilder
Watch tutorial
Sign In Get Support

Applications by Factory Floor

  • Bin Picking
  • Gantry Systems & Path Following
  • Machine Tending
  • Robot 7th Axis
  • Robot Pedestals & Bases
  • Sanding & Surface Finishing
  • Safety Enclosures
  • Jigs & Fixtures
  • Pick & Place
  • Shelves & Racks
  • Timing Belt Conveyors
  • Workstations
  • AGV Top Modules
  • Conveyors
  • Industrial Carts
  • Box Erecting
  • Cartesian Palletizer
  • Cobot Palletizer
  • Case Packing
  • Industrial Robot Palletizer
Sign In Get Support

Applications by Industry

  • Box Erecting
  • Case Packing
  • Cobot Palletizer
  • Industrial Robot Palletizer
  • AGV Top Modules
  • Gantry Systems & Path Following
  • Industrial Carts
  • Jigs & Fixtures
  • Industrial Carts
  • Jigs & Fixtures
  • Machine Tending
  • Robot 7th Axis
  • Machine Tending
  • Pick & Place
  • Robot 7th Axis
  • Timing Belt Conveyors
  • Pick & Place
  • Robot Pedestals & Bases
  • Timing Belt Conveyors
  • Workstations
  • Conveyors
  • Machine Tending
  • Robot Pedestals & Bases
  • Workstations
  • Machine Tending
  • Robot 7th Axis
  • Robot Pedestals & Bases
  • Sanding & Surface Finishing
  • Bin Picking
  • Robot 7th Axis
  • Robot Pedestals & Bases
  • Safety Enclosures
Sign In Get Support

  • Resource Library
  • MachineMotion
  • Controller Peripherals
  • Keyence Laser Scanner & Light Curtain User Manual
Download doc
Related Resources:
  • Safety Module Datasheet (CE-SA-008-0000__2)
  • Robot Safety Module User Manual
  • Robot Safety Module Datasheet
  • Digital I/O Module v2 User Manual
  • Digital I/O Module v2 Datasheet
See all MachineMotion - Controller Peripherals Resources
Back to resource library
User manual Updated: Thursday, May 18th 2023

Keyence Laser Scanner & Light Curtain User Manual

Contents

  • Overview
  • Connecting to MachineMotion 2
    • Keyence SZ-V Laser Scanner to MachineMotion 2
    • Keyence GL-R Light Curtains to MachineMotion 2
  • Keyence Laser Scanner SZ-V04 (Parent) & SZ-VH1 (Child)
    • Description
    • Getting Started
  • Keyence GL-R 745mm, 1465mm & 1900mm Light Curtains
    • Description
    • Getting Started
    • Safety Installation guidelines
  • Muting
    • PNP Sensor Muting Configuration
    • Muting for Laser Scanner
    • Muting for Light Curtain

Overview

Safety devices are essential for a safe work environment. They can be used in various configurations to monitor safety zones where access is limited. Only one safety device (laser scanner or light curtains) can be connected to Vention’s Safety Module at a time. If you need to interface N number of safety devices to MachineMotion V2, you will need N number of safety modules (daisy-chained). Please refer to the User Manual for more information about the connections.

Connecting to MachineMotion 2

Keyence SZ-V Laser Scanner to MachineMotion 2

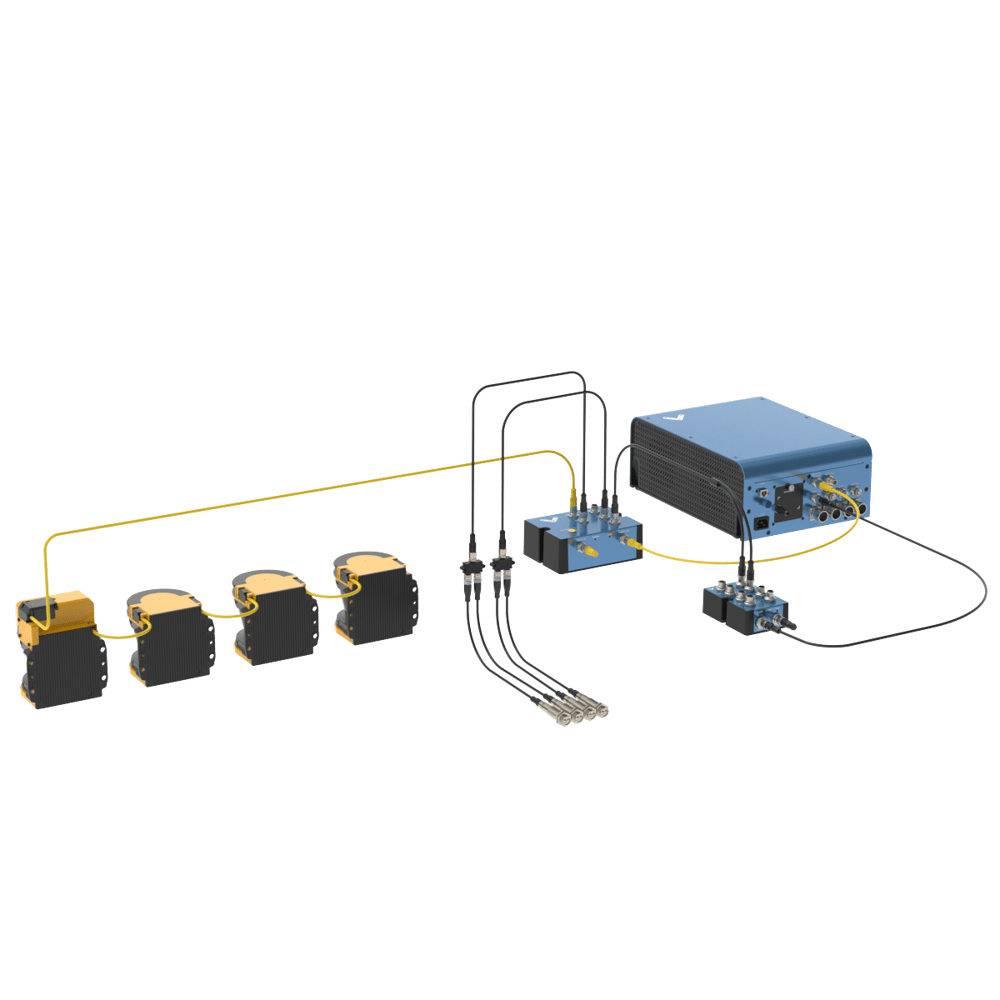
The steps to connect the Laser scanner to MachineMotion 2 via the Safety Module are as follows:

  1. Connect the Keyence Laser Laser scanner - Parent (Safety Module Compatible) to a Safety Module (CE-SA-008-0000__3) through the SAFETY RX connector using the Keyence SZ-V Laser scanner Power cable 5m to M12-12 Male Cable (CE-SA-120-0001).
  2. Connect a MachineMotion 2 Safety Extension Cable (CE-CA-102-5001) to the Safety Module’s SAFETY OUT connector and MachineMotion 2’s SAFETY IN connector.
  3. If muting is required, connect the muting sensor in pairs to the Muting Sensor Y Adapter. Then connect the adapter to the Safety Module via the MUTING 1 and/or MUTING 2 connectors. Safety Module Muting Kit (CE-AP-002-0000) is not included with the Safety Module.
  4. If bank switching is required, connect the Bank Switching Cable for Safety Module and DIOv2 (CE-CA-067-5000) to the CTRL IN connector on the Safety Module and to the Digital IO Module V2 (CE-MD-001-0000__2) outputs. Bank Switching Cable for Safety Module and DIOv2 (CE-CA-067-5000) and Digital IO Module V2 (CE-MD-001-0000__2) are not included with the Safety Module

Note: If no other safety devices are being daisy-chained to the Safety Module, a safety jumper (CE-SA-102-0001) must be used on the Safety Module’s SAFETY IN connector.
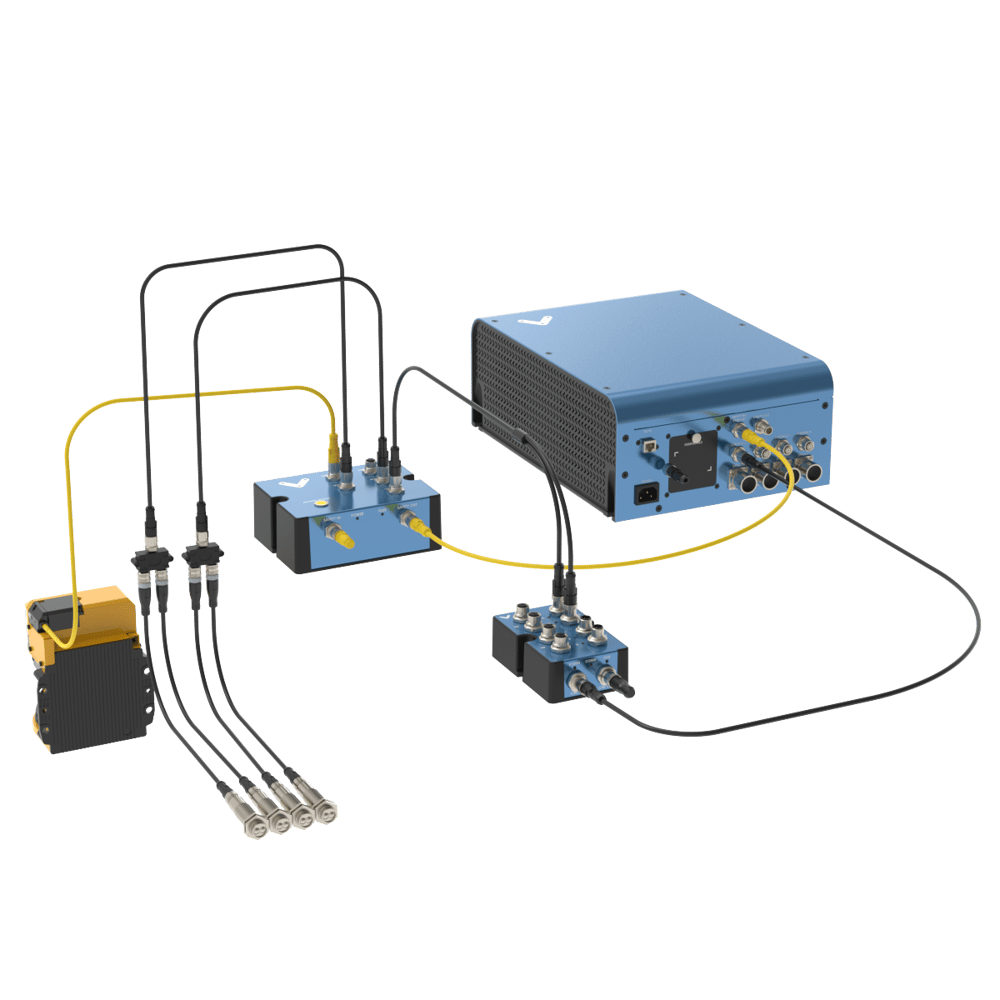
Keyence Laser Scanner (Parent only) wiring diagram

Keyence Laser Scanner (Parent-Child cluster) wiring diagram

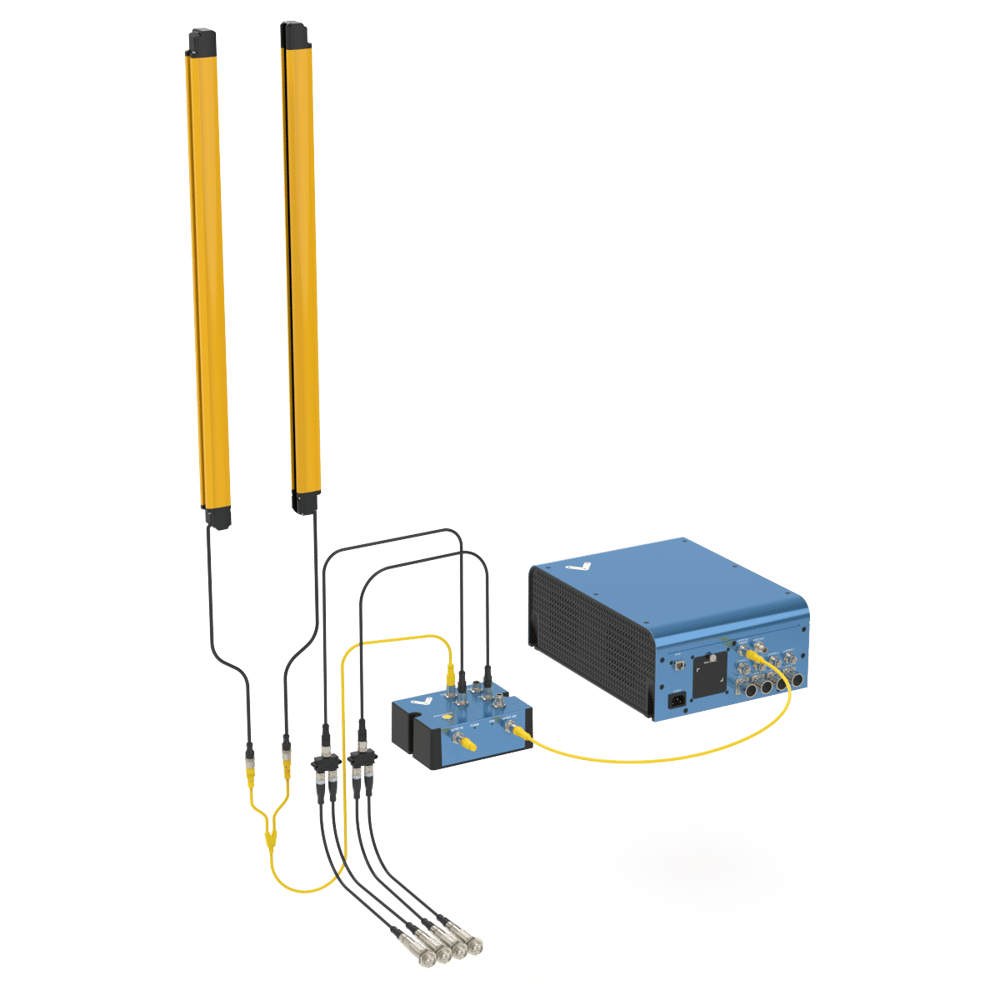
Keyence Light Curtain wiring diagram

Keyence GL-R Light Curtains to MachineMotion 2

The steps to connect Keyence GL-R Light Curtains to MachineMotion 2 via the Safety Module are as follows:

  1. Connect the receiver and the emitter to CE-SA-118-0001 cable using 2 × CE-SA-119-0001 (one for the receiver and one for the emitter). Then, connect CE-SA-118-0001 to the Safety Module on SAFETY RX connector.
  2. Connect a MachineMotion 2 Safety Extension Cable (CE-CA-102-5001) to the Safety Module’s SAFETY OUT connector and MachineMotion 2’s SAFETY IN connector.
  3. If muting is required, connect the muting sensor in pairs to the Muting Sensor Y Adapter. Then connect the adapter to the Safety Module via the MUTING 1 and/or MUTING 2 connectors. Safety Module Muting Kit (CE-AP-002-0000) is not included with the Safety Module.

Note: If no other safety devices are being daisy-chained to the Safety Module, a safety jumper (CE-SA-102-0001) must be used on the Safety Module’s SAFETY IN connector.
Keyence Laser Scanner SZ-V04 (Parent) & SZ-VH1 (Child)

Description

The Keyence Laser Scanner (SZ-V04 ) is an essential tool to ensure safety in the workplace. It can be used in multiple orientations to monitor large areas while remaining discreet and unobstructive. It will stop a machine if any undesired person or object crosses its safety zone. It features a couple of useful functionalities such as muting; automatically deactivates the safety status of the whole system (total muting) or part of it (partial muting) to let material pass through. Another useful function is bank switching; ability to switch between two zone configuration (useful for muting two zones independently). A PC with an Ethernet port is required for configuration.
In order to use the Laser Scanner with MachineMotion2, a Safety Module (CE-SA-008-0000__3) is required, please refer to the safety installation guideline section for the wiring.
The Laser Scanner specifications are as follows:

  • Maximum safe zone: 8.4 m radius.
  • Maximum warning zone: 26 m radius.
  • Detection angle: 190°.
  • Total/partial dynamic muting optional kit available (CE-AP-002-0000).
  • Zone switching (bank switching) available with the purchase of the CE-CA-067-5000 cable.

Getting Started

  1. Assemble the Laser Scanner bracket and mount it at the desired location.
  2. Download the latest version of KEYENCE Safety Device Configurator software here
  3. Install the KEYENCE Safety Device Configurator by following the installation instructions
  4. Connect the laser scanner to PC using the provided USB cable


    Figure 1
  5. Power the MachineMotion controller
  6. While the laser scanner is powered, open the KEYENCE Safety Device Configurator
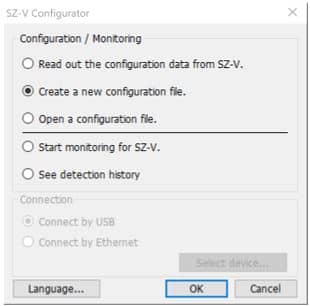
  7. Select Create a new configuration file and click OK

Figure 2

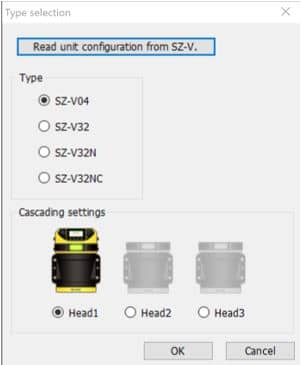
8. Select the model of the laser scanner you have (SZ-V04 for parent, SZ-VH1 for child) and click OK

Figure 3

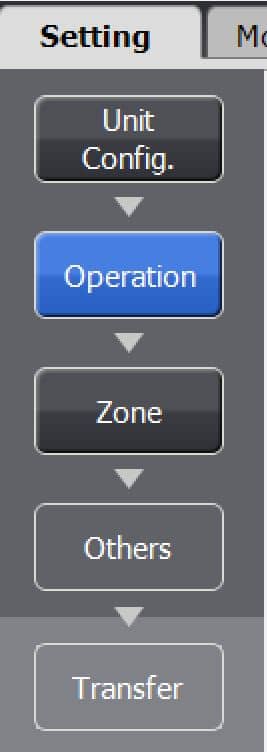
9. In the Setting menu, select on Operation

Figure 4

10. In the Safety configuration section, select the compatible input type as PNP and Interlock as Automatic/Automatic (when used with a Vention Safety Module), leave EDM as Not used

Figure 5

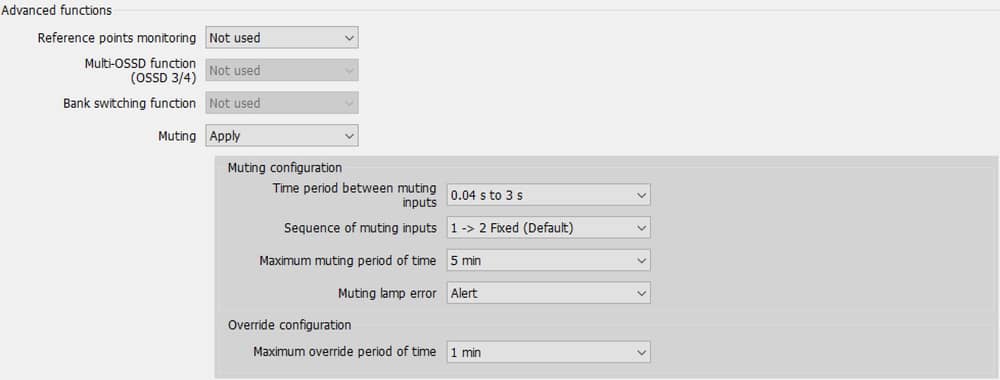
11. Go to the Advanced functions section and enable Muting as shown in the picture below.

Figure 6 - Diagram shows muting enabled

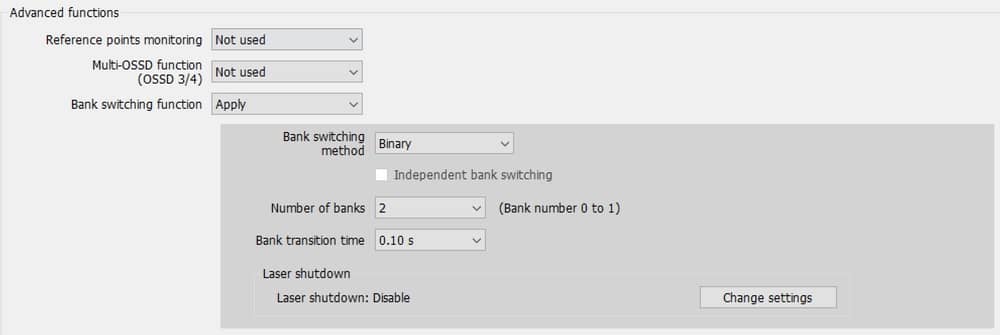
12. If the Bank Switching function is required and you have already purchased the optional cable (CE-CA-067-5000) that enables the functionality, enable this function in the Advanced functions section. Note that Muting and Bank Switching functions cannot be enabled at the same time.

Figure 7 - Diagram shows bank switching enabled

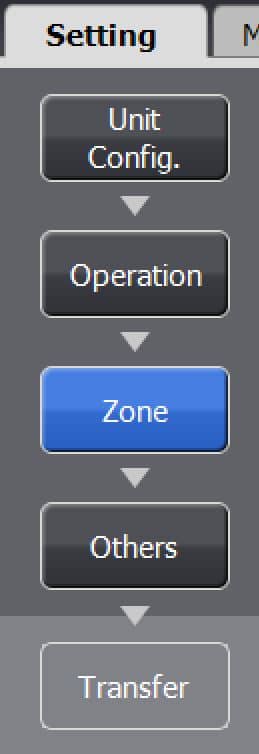
13. In the Setting menu, select Zone to configure the safety zone of the scanner

Figure 8

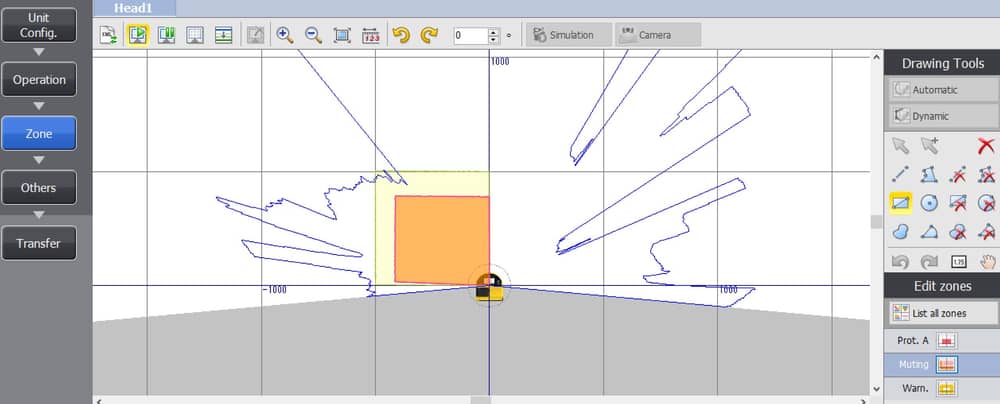
14. Draw the desired protection and warning zones using the Drawing Tools menu in the right side of the screen. If the Muting function is enabled, the muting zone should also be configured in this step using the tools on the right side menu

Figure 9

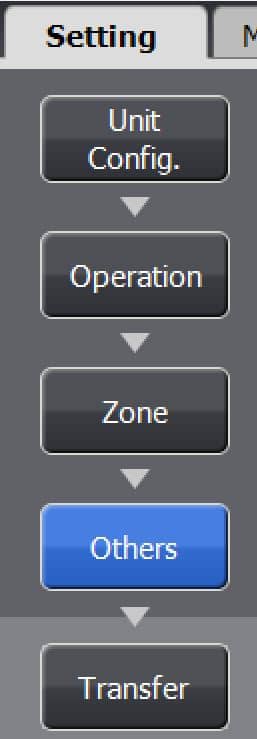
15. Once completed click on the Setting menu, select Others

Figure 10

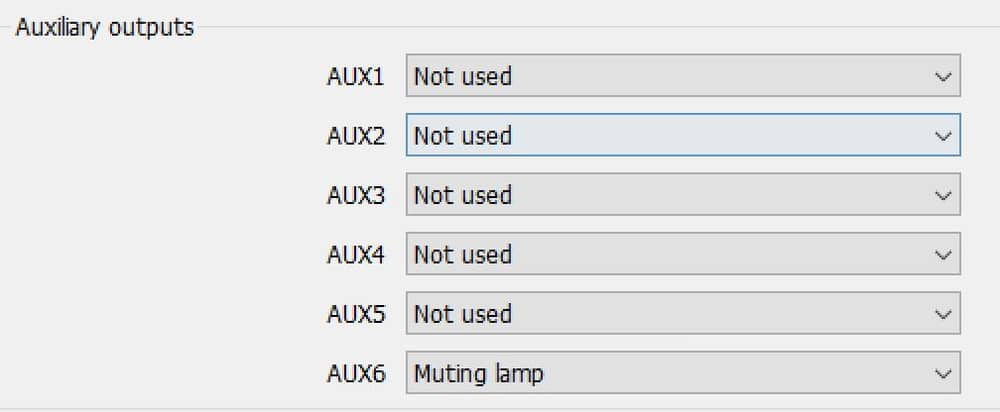
16. If the Muting function is available and enabled, AUX6 should be set as a Muting lamp output in the Auxiliary outputs section otherwise, keep all selections as Not used

Figure 11

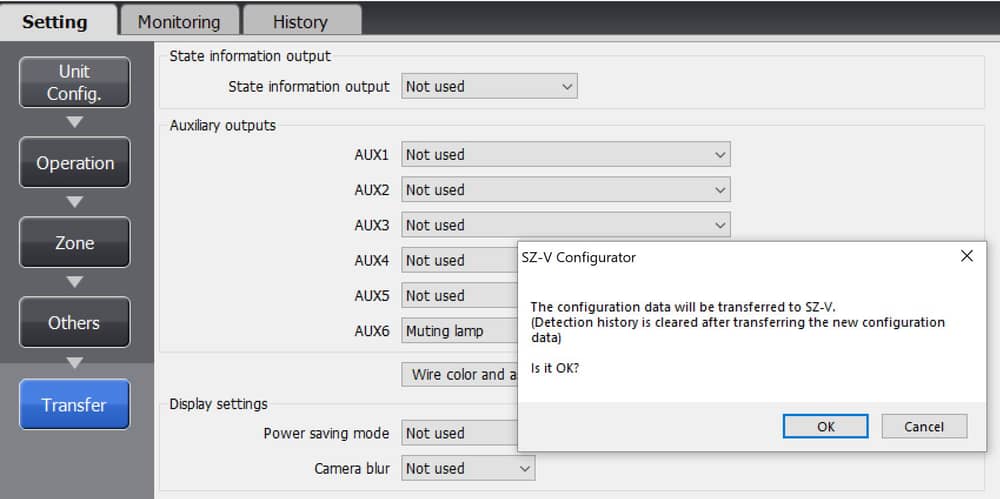
17. Next, click on Transfer as shown below

Figure 12

18. Click OK
19. Enter your new Password. (The default password is set to 1111)
20. Click OK
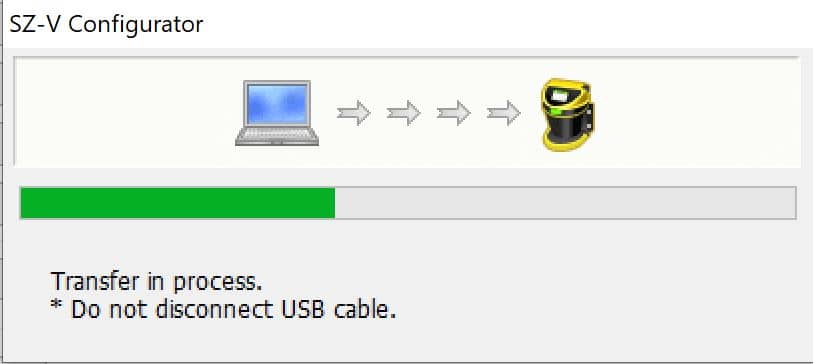
21. The configurator software will load the new configuration file onto your connected laser scanner

Figure 13

22. Select OK and Accept the configuration data
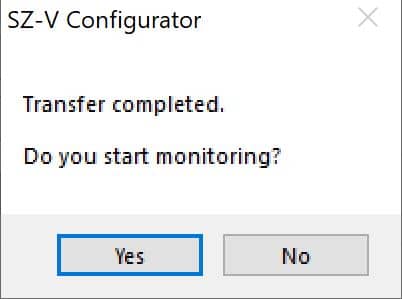
23. When the configuration file transfer is completed, select Yes to start monitoring

Figure 14

Keyence GL-R 745mm, 1465mm & 1900mm Light Curtains

Description

The Keyence Light Curtain (GL-R ) is an essential tool to ensure safety in the workplace. It can be used in multiple orientations to monitor large areas while remaining discreet and unobstructive. It will stop a machine if any undesired person or object crosses its safety zone. Muting is also available with the purchase of the Safety Module Muting Kit (CE-AP-002-0000). In order to use the Light Curtain with MachineMotion2, a Safety Module (CE-SA-008-0000__3) is required, please refer to the safety installation guideline section for the wiring. The Light Curtain specifications are as follows:

  • Detection capability: ø25 mm
  • Beam axis spacing/Lens diameter: 20 mm / ø5
  • Detecting distance: 0.2 to 15 m
  • Effective aperture angle: Max. ±2.5° (When operating distance is 3 m or more)
  • Total/partial dynamic muting optional kit available (CE-AP-002-0000).

Getting Started

  1. Choose an appropriate position for the light curtain, and mount both the emitter and the receiver with the connectors pointing in the same direction using the two included mounting brackets (GL-RB02).
  2. The light curtain should be carefully positioned to provide the necessary protection. Access to the dangerous area must only be possible by passing through the light curtain safety zone.
  3. Configuring Keyence Light Curtains is not needed when using the provided cables (2x CE-SA-119-0001 and CE-SA-118-0001).

Safety Installation guidelines

According to safety guidelines, a light curtain barrier should have a maximum gap of 180 mm from the bottom and a minimum height of 1400 mm when there are no height restrictions.
The same safety guidelines apply for a laser scanner mounted vertically (i.e. monitoring the vertical plane).

Muting

The muting function automatically deactivates the safety status of the whole safety area (total muting) or part of it (partial muting). This feature is particularly suitable when an object, but not a person, has to pass through the dangerous area. This feature also allows carrying out cyclical operations without blocking a working machine.

Muting sensors must be placed according to the material’s length and speed so they can recognize passing objects (such as pallets, vehicles, etc). Generally, two muting sensors are used, and they must be triggered sequentially. It is also possible to use four muting sensors (where sensors A1 and A2 are connected together and B1 and B2 are connected together).

Unidirectional muting is used for objects entering or leaving an area. It requires two sensors, spaced at a distance slightly less than the length of the moving object, in order to detect undesirable objects with different dimensions or orientations.
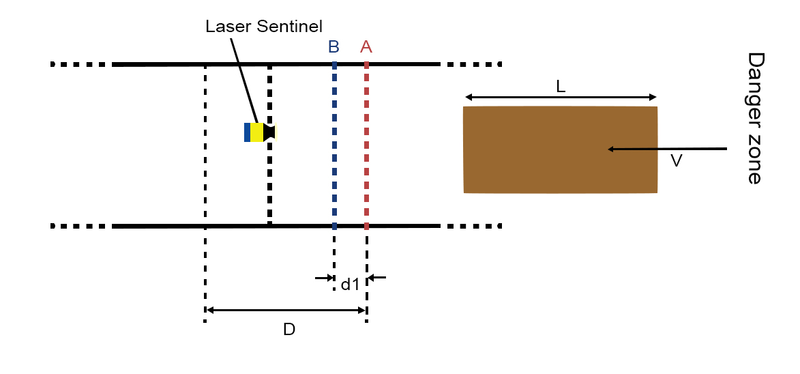
Figure 17: Unidirectional muting

Bidirectional muting is used for objects entering and leaving an area. In this case, four sensors must be used: two on one side of the safe zone (A1 and B1), and two on the other side (A2 and B2). Sensors A1 and A2 are connected together, and B1 and B2 are connected together. They should be spaced at a distance where two consecutive sensors are always triggered throughout the movement of the object across the safety zone.
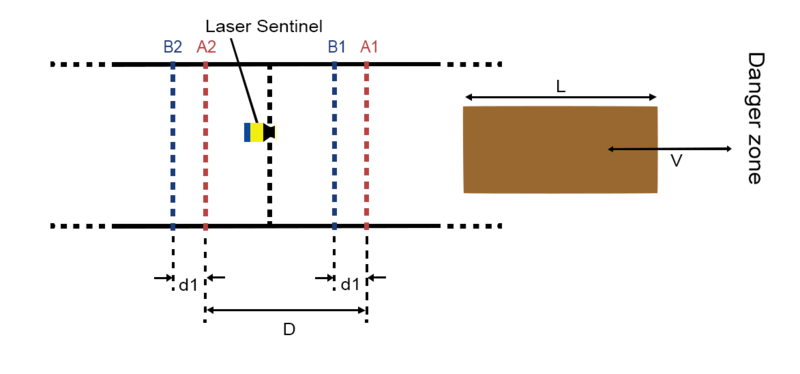
Figure 18: Bidirectional muting

PNP Sensor Muting Configuration

When muting with Vention Muting kit (CE-AP-002-0000), please use the procedure below to configure the PNP sensors.
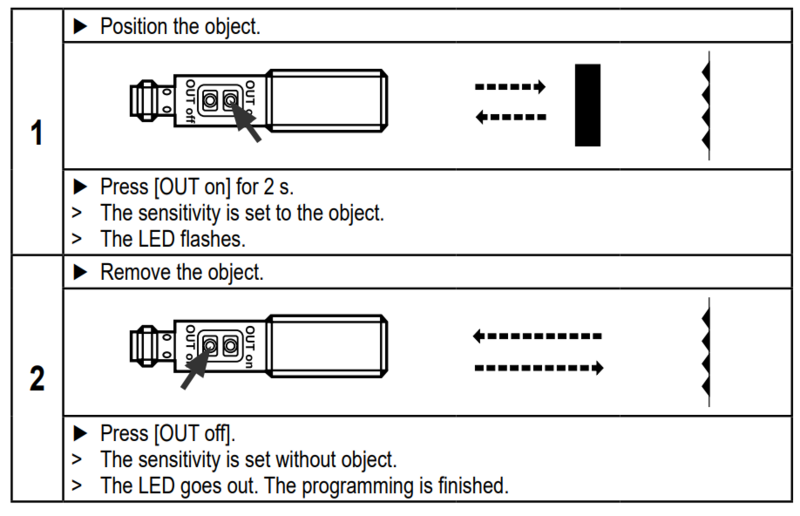
PNP Muting Sensor Configuration

Muting for Laser Scanner

The Laser Scanner can perform both unidirectional and bidirectional muting.

In unidirectional muting, the “m” coefficient must be defined. This coefficient controls how long the safety zone remains off before reactivating. In other words, it defines the activation time delay following a muting event.

The “m” coefficient is a multiple of the real delay between Muting 1 and Muting 2 (T12). The range of this coefficient is an integer between 2 and 16 inclusive.

Note: When muting is triggered, all defined muting zones in the active zone set configuration will be muted
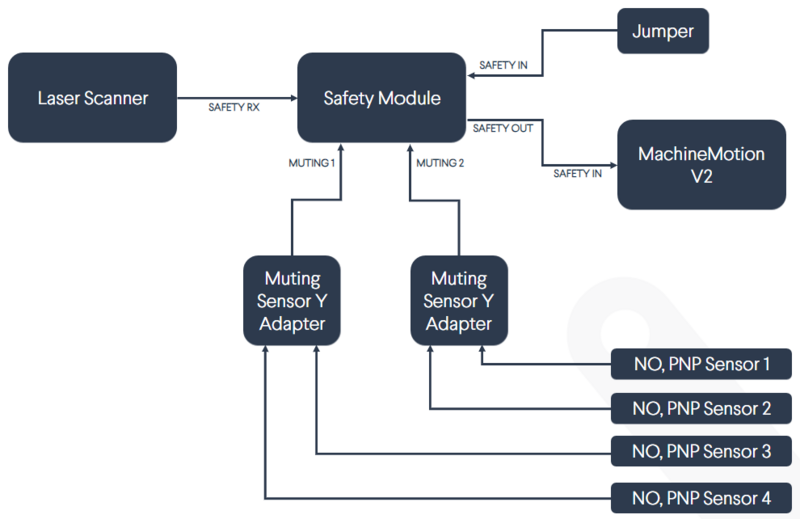
Figure 19: Safety Module with Laser Scanner block diagram (with muting)

Muting for Light Curtain

The Light Curtains can only perform bidirectional muting, which requires four sensors. Once muting is activated, the entire safety zone will be muted (total muting). Partial muting cannot be used with the Light Curtains.
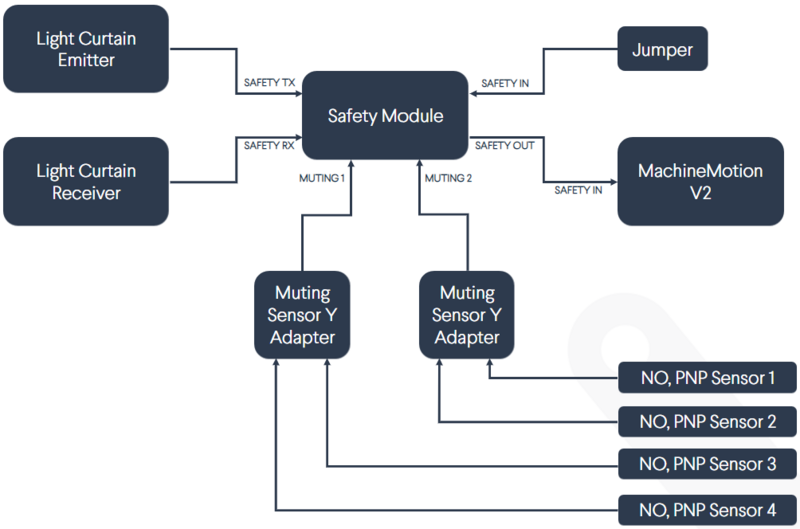
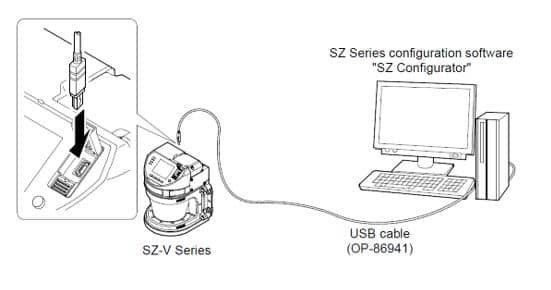
Figure 20: Safety Module with Light Curtains block diagram (with muting)

Was this information helpful?

Still need help?

Ask the User Forum Contact support
vention-logo
Simplified Machine Design for Everyone.
Book a demo Get support
Email: info@vention.cc
Call: +1-800-940-3617
Platform
  • MachineScope
  • MachineBuilder
  • MachineLogic
  • MachineApps
  • MachinePortal
  • MachineCloud
Hardware Technology
  • MachineFrame
  • MachineMotion
  • Actuators
Applications
  • Browse All Applications
  • Manufacturing
  • Assembly
  • Material Handling
  • Packaging
Hardware Library
  • Browse All Hardware
Designs Library
  • Browse All Designs
Resources
  • Resource Center
  • Customer Stories
  • Video Tutorials
  • Webinars
  • Blog
  • FAQ
Tools
  • Browse Tools
Community
  • Community
  • Top Designer
  • Forum
  • Gallery
Learn & Connect
  • About Us
  • Press
  • Contact Us
  • Careers We're hiring!
Vention 2023
Terms Privacy Security