Once you’ve learned about how to select the correct vacuum gripper (see Part Three of our “Building a Robot Cell” series), it’s time to build your first robot application. Collaborative robots, plug & play automation components, and manufacturing automation platforms (MAPs) are driving the development of proven robot applications, like machine tending, screw driving, and palletizing, to name a few. These are easing the design and deployment of robot cells on manufacturing floors, with projects now realized in a matter of days instead of months. If you are considering a project like this, below is a simple guide to planning all aspects of your robot cell.
Step 1: Plan your robot cell project
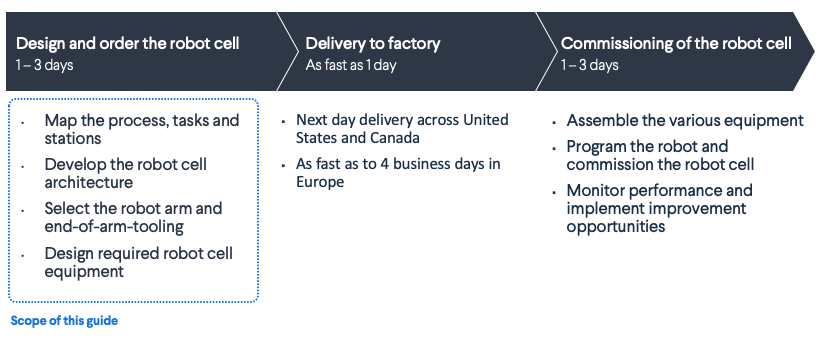
Robot cell projects can now be realized in less than one week from beginning to end. That said, most users will take around three weeks to navigate the workflow. This guide will focus on the first phase: designing the robot cell. Expect to dedicate a few days to this initial phase, to map the current and desired tasks within the cell, select the right robot technology, and design all the equipment required for the cell to operate properly.
Step 2: Map your robot cell process, tasks, and stations
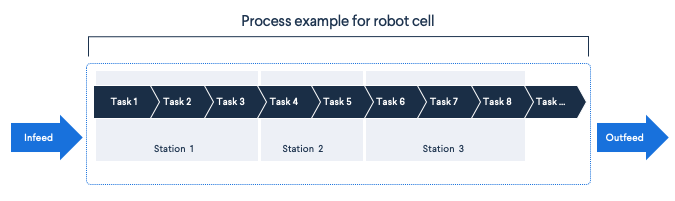
A simple way to understand a robot cell is through processes, tasks, and stations. A cell often covers an end-to-end production process, combining multiple tasks to be accomplished. Tasks are grouped into stations, which are operated by either a robot, production equipment, an operator, or a mix of all three. The schematic below helps clarify the structure of a production cell to automate.
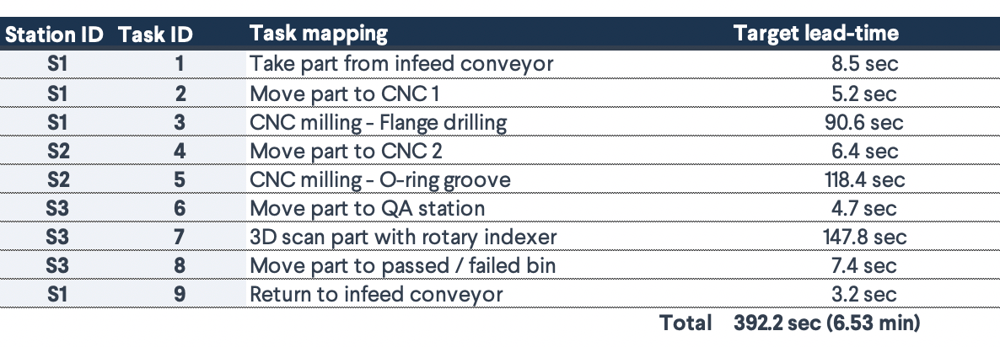
When designing a robot cell, it is important to develop a clear list of tasks to be automated. The example below is for a casted flange machining operation consisting of two manufacturing steps and one quality inspection step. At the end of the process, parts are either approved or rejected and placed in the appropriate bins. The cell includes a total of nine distinct tasks, grouped into three stations. Target lead time was added for each task of the cell. This information will be helpful later when selecting which robot technology to buy and evaluating the return on investment.
Step 3: Develop the robot cell architecture
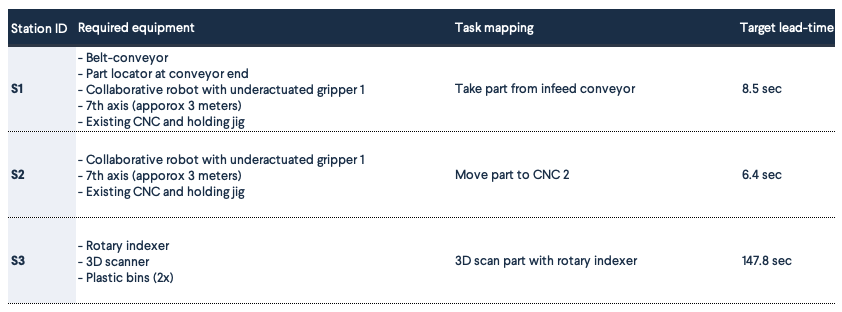
Equipped with the full task list and station breakdown, you can then develop the high-level architecture. This defines the rough placement or layout of production equipment required inside the robot cell, including infeed and outfeed systems (like a bin, belt conveyor, or gravity chute). All stations should be positioned relative to each other in a way that maximizes overall cell throughput, guarantees operator safety, and provides easy access for maintenance. For stations that will later be operated by a robot, make sure you evaluate how far the robot can reach across and between stations. Upon completing this step, you should have a clear understanding of the overall robot cell dimensions, and how material gets in and out of the cell. In addition, you should have an initial inventory of the required equipment at each station.
Step 4: Select your robot arm and end-of-arm-tooling
Considering the set of tasks in your robot cell, desired lead time, and ROI target, you will have to select the appropriate robot technology. There are four core technologies to consider when selecting a robot arm for your application: industrial, collaborative, SCARA, and delta (see Part One of our “Building a Robot Cell” series for more information). Each of these technologies has different performance levels based on the criteria below.
- Maximum payload. Weight the robot arm can lift.
- Reach. Distance from the center of the robot to the fullest extension of its arm.
- Speed (cycle time). Time required to complete a given task.
- Repeatability. Ability to pick something up at the exact same spot over numerous cycles.
- Support ecosystem. Availability of off-the-shelf accessories and expert support.
Similarly, end-of-arm-tooling technology varies greatly in performance, but recent developments in off-the-shelf products, like two-finger grippers and vacuum grippers, mean there is now a much greater choice available. If your robot cell is dedicated to applications like machine tending, assembly, or de-burring, a parallel or underactuated gripper might be best. Part Two of our “Building a Robot Cell” series explains the advantages of two-finger gripper technologies. Alternatively, if your robot cell is dedicated to applications like bin picking or palletizing, a vacuum gripper may be more appropriate. See Part Three of our “Building a Robot Cell” series for more information.
Step 5: Design the required robot cell equipment
New manufacturing automation platforms (MAPs) like Vention now let manufacturing professionals design in 3D and order all the equipment they need for their robot cell, directly from their web browser, in just a few hours. A typical robot cell includes a lot more than just the robot and end-of-arm tooling. Additional equipment, like an infeed gravity chute, material handling conveyor, part holding jig, robot pedestal, and seventh axis (range extender) is often required for the full robot cell to work.
If you’re not sure where to start a new design, browse Vention’s Design Library for inspiration in the public design library. Thousands of open-source designs are available now. Or if you already know what you want to build, use MachineBuilder (it’s free!) to select all the equipment you need from a library of modular parts. To get started with MachineBuilder, watch a video tutorial on navigating MachineBuilder.
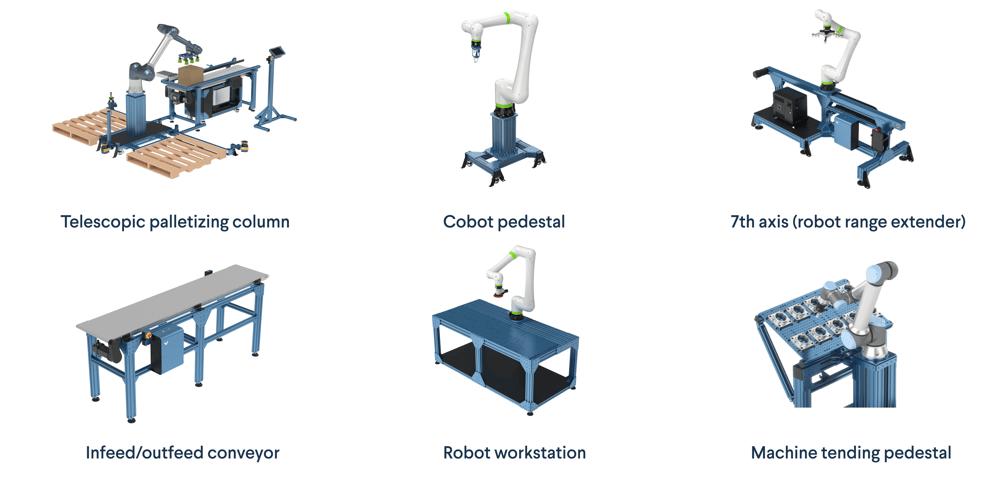
Beyond the robot and end-of-arm tooling, you might need some of the above components for your robot cell.
Need help designing your first robot cell? Our experts will be happy to schedule a video conference to help you navigate these steps, including choosing a robot arm, selecting end-of-arm tooling, and designing equipment.
