Palletizing is the last step in a secondary packaging line. Many businesses struggle to recognize the value of automating the palletizing step, which is often overlooked when updating processes and equipment.
To address this, we’ll take a closer look at cobot palletizing by considering:
- When is it beneficial to automate robotic palletizing?
- Common configurations and design criteria for setting up a palletizing cell.
- How to reduce payback time and earn a higher ROI.
What is a cobot palletizer?
In a typical production line, your product is placed into boxes or bags and brought to the end of the line, where these packages are placed on a pallet and loaded onto a truck.
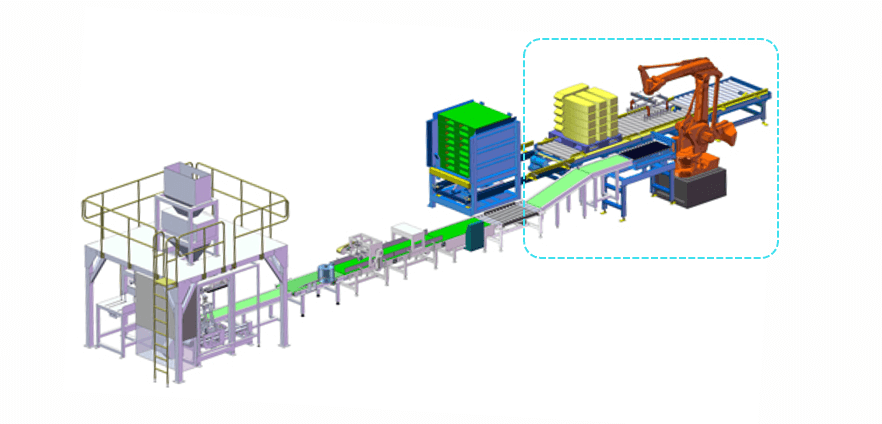
Above is a depiction of a traditional packaging line. For the purpose of this post, we’re going to focus on palletizing at the very end of the line. This traditional automation example looks complex and expensive, but that’s where collaborative robots like Universal Robots, Fanuc, and Doosan come into play. They make it cheaper and easier to automate your palletizing operations.
Why automate palletizing?

Let’s look at a simple example. In the chart above, we have one scenario where a single operator does the manual palletizing. The second scenario is automated, with the work done by both a robotic palletizer and an operator.
In both scenarios, the dark blue bars represent the work done by the operator. In the first scenario, the operator works non-stop loading and unloading the pallet. The red bars represent the time during which palletizing is stopped because the operator needs to move the pallet. As you can see, this is not the most efficient way to operate.
The light blue bar in the second scenario represents time the cobot working, which is non-stop. The operator, represented by the dark blue bars, now only needs to work part-time. The green bars represent the time the operator can spend working on something else. This could be anything around the work area, or even managing another cobot at the same time.
As you can see, Scenario 2 increases the amount of free time the operator gets, which in turn increases the ROI. With greater operator downtime, the operator can be deployed to higher-value work. And with the reduction in physical labor, work-related injuries are also less likely to occur.
Cobot palletizer configurations
Your choice of palletizer configuration depends on many considerations: how much space you have (footprint), your budget, application-specific needs, and more. Here we cover the three most popular configurations: telescopic, vertical gantry, and fixed-height.
The telescopic cobot palletizer, made of a telescopic pillar, has a limited footprint and is simple to deploy. You can easily adjust the vertical height to create an ideal working position during palletizing.
The vertical gantry palletizer, equipped with a linear actuator and MachineMotion controller, can be customized to your specific application. For example, the height can be adjusted, or it can be placed on top of another range extender for added reach.
The fixed-height cobot palletizer is the simplest and most cost-effective design. With no up-and-down movement, there is no need for a linear actuator. This is basically a robot on a pedestal that moves pallets around the base. These palletizers have a limited reach, so they typically only work with smaller pallets such as Euro format.
Configuring your cobot palletizing cell
When selecting the configuration for your shop floor, there are a number of important criteria to consider. This list is not exhaustive, but it provides a good starting point.
v
| Packaging |
|
|---|---|
| Pallets |
|
| Flexibility |
|
| Environmental constraints |
|
Selecting your end-of-arm tool (EOAT)
The following criteria will help you select the best EOAT for your application. Closed boxes are the easiest, but there are solutions on the market for open-top boxes or bags.
| Gripper |
|
|---|---|
| Other accessories |
|
| Cable management |
|
| Add-ons |
|
Adding peripherals
The next thing to consider is whether you want to add more peripherals to your cobot palletizer. One of the most enabling and versatile options is Vention’s MachineLogic for Universal Robots.
With MachineLogic for UR, you can integrate Vention’s MachineMotion controller with the UR controller and add a ton of peripheral equipment—such as conveyors, small actuators, rotary tables, or full-size actuators for things like range extenders.
Commissioning your cobot palletizer
To simplify commissioning, we’ve created a cobot palletizing integration guide. The integration guide includes tips and tricks and step-by-step instructions.
Maximizing your cobot palletizing investment
When deciding whether to invest in a cobot palletizer for your production line, calculating the ROI is critical. We’ve built an ROI calculator to help you do just that.
Vention’s cobot palletizer payback model lets you input parameters so that you can tailor the scenario to your needs. It allows you to compare your current process to the potential cobot version, to see what it could look like if it was automated.
Example
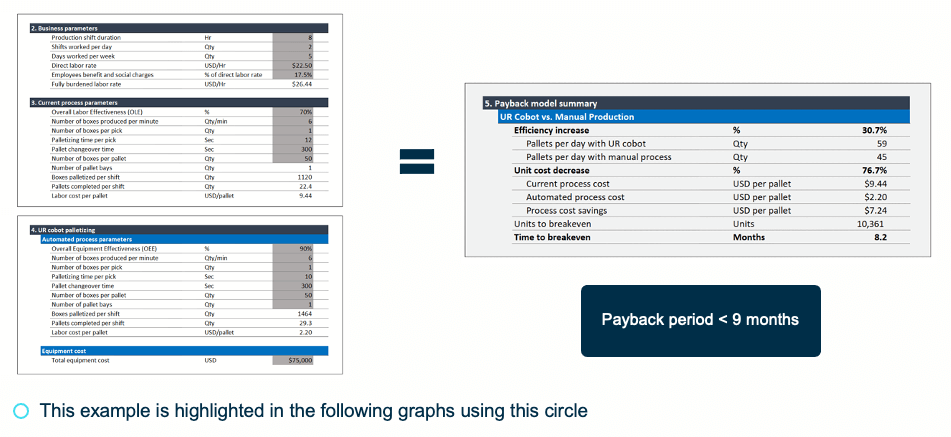
In the example above, we’re comparing a single operator using a manual process to an automated solution with one cobot and one operator. The model considers the number of pallets, the time it takes to bring a new pallet, and the time it takes to add and remove a pallet from your production line. These parameters are important to specify, because there is no point getting a faster robot if your production line is too slow to keep up with the speed of palletizing.
In this example, efficiency increased by 30%, unit cost decreased by 76%, and the payback period was 8 months.
Now, let’s look at the impact of different parameters on the payback period.
Productivity: Run longer shifts
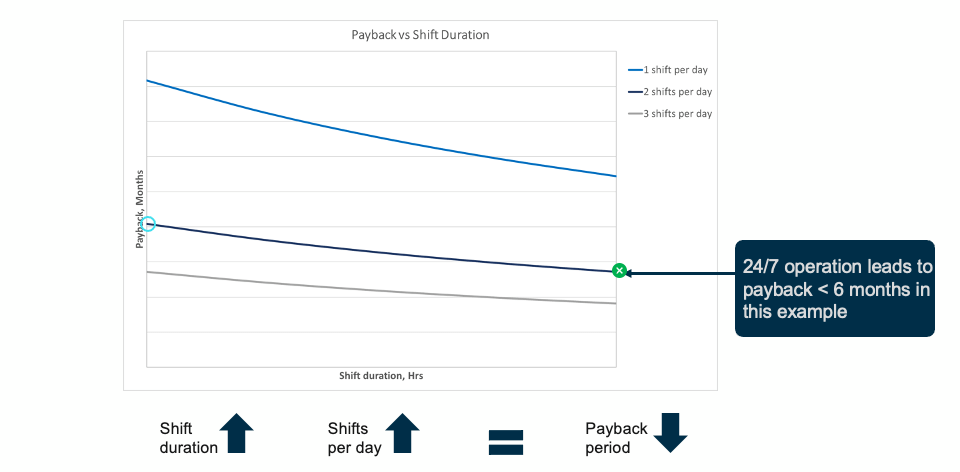
Increasing production shortens the payback period. You can accomplish this by having longer and more shifts per day. The chart above illustrates three scenarios: one, two, and three shifts per day.
In this model, 24/7 operations lead to a payback period of less than six months.
Productivity: Add more pallets
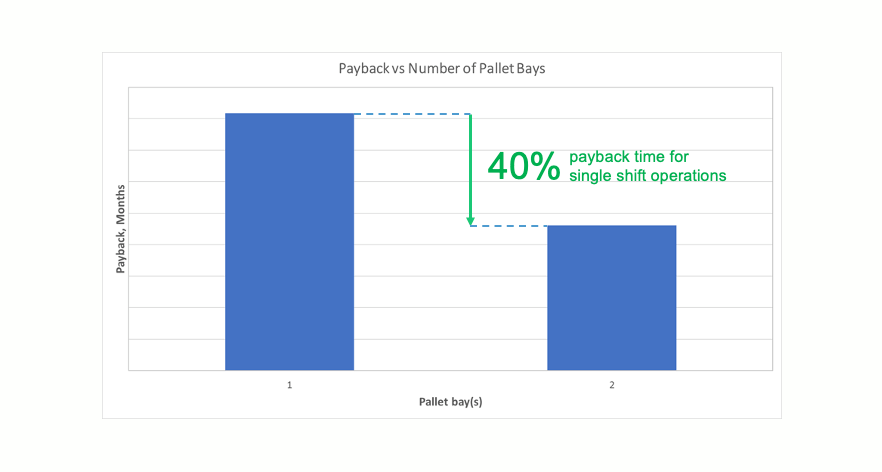
Adding an extra pallet also reduces the payback period. In this example, we have a 40% decrease on the payback time for a single-shift operation. This is achieved because the cobot can work in tandem with the operator, reducing the amount of downtime between pallets.
Labor rates: Redeploy operators to higher-value tasks
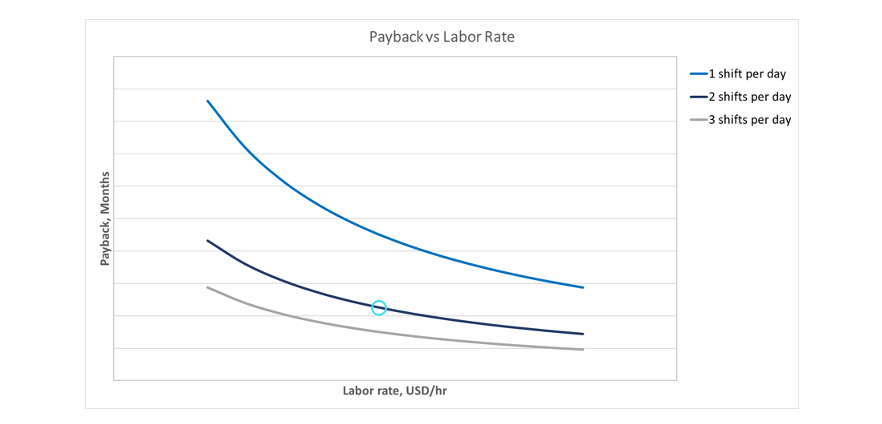
Next we’ll look at the effects of the labor rate on payback. This is a sensitive topic, since it involves displacing the operator. The ideal situation frees the operator to focus on more engaging, higher-value tasks—a win for everyone. Since labor supply and wage rates vary regionally, the location of your facilities can be a determining factor.
In the example above, we compare the payback period for three different scenarios (involving one, two or three shifts), taking labor rates into account.
Equipment costs: Only pay for what you need
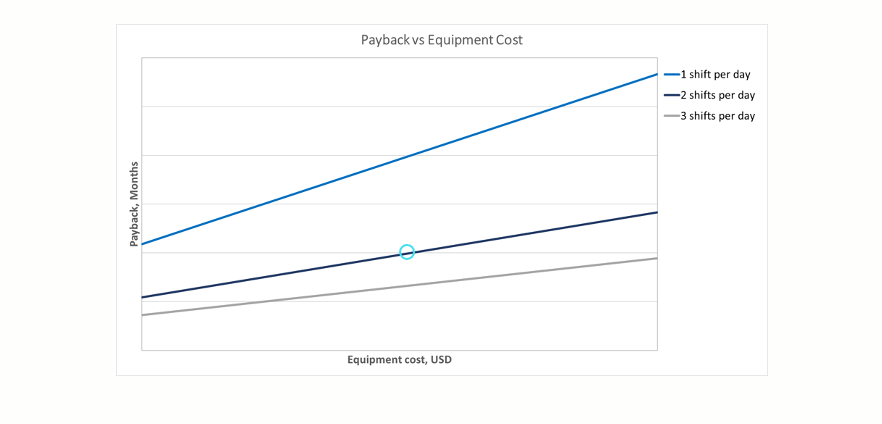
In general, the relationship between equipment cost and payback period is linear—so be careful how much you pay for equipment!
You should only pay more for value-added features. There are so many solutions available on the market, it’s easy to get overwhelmed and pay for features you’ll never use.
Remember: For every solution out there, the cost of the robot is the same, and the cost of the hardware and software will be similar. Only pay more if you’re getting a major extra feature, like a range extender to service more pallets, which will provide you with a big increase in output.
Conclusion
When considering a palletizing solution for your production line, the ability to estimate ROI is essential as is an intuitive grasp of which parameters affect it and how. Before jumping into design, make sure you identify the criteria most important to your application. Modify the different parameters using Vention’s ROI calculator and determine which configuration will help you maximize your return.
